Let’s Get Personal

At work one day back in 1981 I received a phone call from Russ Borneman, who worked in the Human Resources Department of The Church of Jesus Christ of Latter-Day Saints. He asked me if I would consider accepting employment with the Church. After some consideration, I accepted that offer. He asked me how soon I could begin working for them, and I told him I would need a month to finish the project I was working on at Utah State University.
At the end of that month, I showed up at the Church Office Building. It was then I learned that the project manager for whom I was going to work was no longer employed by the Church, and the project which I had been hired to work on was no longer a project. I spent lots of time reading manuals, and wondering if I had made a major mistake in my life. One morning my new manager (Lynn Warr?) came to my office and asked me to attend a meeting with 4 other programmers. When I got to the meeting, three of the programmers were already there. The last to arrive was Robert Foster. Bob was the lead programmer on the soon to begin Personal Ancestral File project. His first question was, “Brethren, how are we going to implement lineage-linking on a home computer?” My first question, which I was too embarrassed to ask, was “What is lineage-linking?”
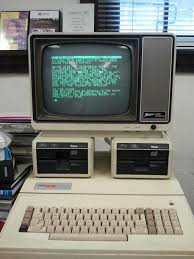
I was on the PAF team for only a short time while they were finding a project they really wanted me to work on. After I left the PAF project, I followed their project from a distance. When they were near production, they asked for volunteers to test the product. They wanted Personal Ancestral File to run on many different types of home computers, so they were looking for as many different types of computers as they could get in the test. By then I had purchased a Franklin Ace 1000 computer. It was a clone of the Apple II computer. It had two floppy disk drives, and I bought a video card which allowed me to convert from the standard Apple 40 column screen to the 80 column screen which was necessary to run PAF.
On my Franklin I could print the information from a particular address in the ROM chip, and it contained a copyright notice from Apple Computer Company. The Franklin was a better computer than the Apple II, In My Humble Opinion, but since Franklin stole the ROM from Apple, they eventually went out of business after the lawsuit.
When I finished my testing of PAF, I wrote a report on what worked or did not work to my satisfaction, and a list of things I would like to see before PAF went into production.
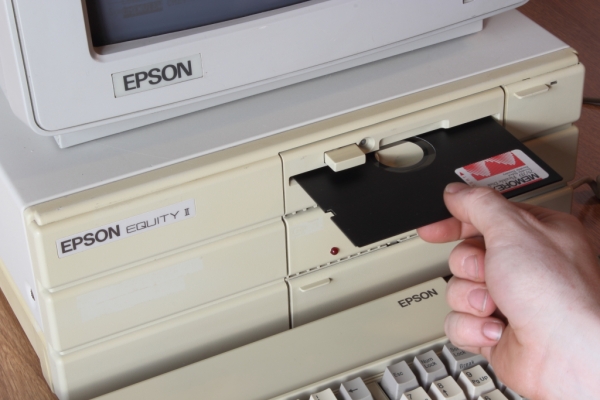
I think the beta test convinced the Church that they couldn’t support all of the different types of computers on the market, meaning the different operating systems. The final product worked only on PC-DOS and MS-DOS operating systems, meaning the IBM PC and IBM clones. At the Church, we had some of the old IBM portable (luggable) PCs available, and I hauled one from and to work several times while I played with the program. I eventually bought an Epson Equity II computer, with the optional, and at that time massive, 40 Megabyte hard disk. I was in Heaven.
I kept a spreadsheet with a list of the features I wanted to see in PAF, and periodically I would submit it to the PAF team. When I left Church employment in 1992, PAF included 17 of my suggestions.
In February of 2010 I started volunteering at the Ogden FamilySearch Library. I noticed an icon on the computer screen which I didn’t recognize. I clicked on it, and it started the Ancestral Quest program. It looked and felt familiar, even though I had never seen Ancestral Quest before. I asked whether the FamilySearch Library had a class on Ancestral Quest, and they told me that they had a teacher, but he was unlikely to return because of health issues.
I had few options available. I asked if I could teach the class. That was my way of learning AQ.
Some History
The time came when the Church decided it was necessary to switch PAF from a DOS based program to a Windows based program, to keep up with the operating system which they believed would eventually overshadow PCDOS/MSDOS. PAF 3.0 could run on Windows, but it was totally designed for PCDOS/MSDOS. My opinion is that the Church had 4 options available to them at that point.
- They could train their DOS programmers to write Windows code.
- They could hire Windows programmers to replace their DOS programmers.
- They could hire Windows programmers to work with their DOS programmers.
- They could find a Windows program which already worked with Church specific information.
They chose the 4th option. They found Gaylon Findlay and Ancestral Quest. Gaylon allowed them to alter the source code for Ancestral Quest, and release it as PAF version 4.0 for Windows. That’s why AQ looked and felt so familiar.
After I had been teaching Ancestral Quest for some time I had former students asking how to do particular things in AQ which I had not covered in the class. When I answered their questions I wished that I had a way to let other former students know what questions were being asked, and what the answers were. That was the reason I started AQ Will Do. It teaches the things AQ Will Do, and how to do them.
I taught the AQ class for 6 years. I no longer teach the class, but I still post on AQ Will Do occasionally. If there are topics you would like to see discussed, please leave a Comment or email me at dcmc1945@gmail.com.
Updated: 2023-11-20
State of Confusion

Updated 12 Nov 2023 – AQ Version 16.0.12 – 10/12/2023
In the Yahoo Group [AncestralQuest] an interesting question was asked this morning.
This newsgroup is now accessed with the URL: https://groups.io/g/AncestralQuest
Its LDS related URL is: https://groups/g/AQ-FS
I’m attempting to identify all of my ancestors who have been born, lived, married or died in a particular state. How do I generate such a list?
There are two general approaches to this problem.
1. Use the Contains operator.
2. Query the State position within the place name.
Each of these methods can be problematic, but for different reasons. Let’s start by deciding which of the two methods we will use, and why we will use it.
My years as a volunteer at the Ogden FamilySearch Library have convinced me that most people either are not aware of the advice Gaylon Findlay gave about creating place names in Ancestral Quest, or they have chosen to ignore that advice. He suggested that if we want to be able to use the ability of AQ to select particular groups of places for events in the records, we will need to construct place names in the following format:
City, County, State or Province, Country.
It seems like an easy task, but after viewing many files while trying to help others, I have seen three deviations from this format which appear consistently:
1. Cemetery, City, County, State, Country
2. Church, City, County, State, Country
3. Hospital, City, County, State, Country
AQ will accept these formats for place names and report them faithfully but at this point if an alternate format is used, the ability to select by position in the place name is lost.
It is the comma which defines the position within the place name. Everything up to the first comma is considered by AQ to be the City for selection purposes. Everything after the first comma and up to the second comma is in the County field. Everything after the second comma and up to the third comma is the State or Province, and everything after the third comma, including other commas, is the Country. The Country field now extends only to a comma (if present) for the purpose of selection. For reporting, everything after the comma following State or Provence is considered the Country.
It is possible to have retained part of the positional representation by using these formats:
1. City, County, State, Country, Cemetery
2. City, County, State, Country, Church
3. City, County, State, Country, Hospital
It would still be impossible to identify countries this way because the country name would also have contained the name of the Cemetery, Church or Hospital.
I don’t have the date of the change, but at present Country is presented as everything after the comma ending the State or Province field on screens and in reports, however when using the radio button ‘3 (State)’ in Advanced Filter/Focus only the portion up to the first comma in the Country field is used for comparison and selection. additional information can be added beyond a comma, but that information will not be considered in the comparison of Country names.
This is where logic would tell us to use the Contains operator since it doesn’t depend on the position of the state name in the place name.
Let’s start our report using the Contains method. We would begin by building a Custom Report with the fields we want to examine.

When the fields and sorting order have been determined, click on the Select button.

It is at this point that we will go to the Advanced Filter/Focus and tell AQ to select any record that contains our desired state name in any place name.

Highlight the Any Place field and use the > button to push it into the Current Filter.

Since we are not using positional notation, click on the Full Place radio button. Select Contains from the pull-down window. Enter the name of the state you want to select, and click the OK button.

Our Current Filter looks good, so click on the OK button.

AQ tells us how many records were selected, and we click the OK button.

If we are printing to a PDF file, we click Print, otherwise click Preview. As you examine the report you may notice records which have no place names within are not from Utah or your selected state. How can that be?
Counties and cities across the USA are named after states. Many have their own state name, but this would not be a problem since that’s the state we wanted anyway. The problem is that many counties and cities are named after states other than their own. Here is a list of states that could appear on your list if you select a state which has the name of a county or city equal to or containing the name you selected. This list does not show such places as Kiowa County in Arkansas and Kansas, and it does not show cities with multiple word names.
In the following list, you will see the states in alphabetical order. To the right of the state name, you will see either the name of a county or a city in that state which has the name of a different state.
Here is the list:


If you have followed the advice given as to how to form place names, you can instead follow the same procedure as before up to this place:

Here you would click on the 3 (State) radio button, select Matches from the pull-down window, Enter the name of the desired state, and click OK. If your place names are all built correctly, you will get only the records you wanted.

Suggestions/Questions about AQ Will Do or Subjects discussed here? Click the Comment tab. I would like to hear from you!
Obituaries
In my post Find the Dead I showed a way to Google for an obituary. The way I showed works, but there is a “cleaner” way to do it, and there is a better way to search for married females.
First: Cleaner. Originally I recommended that we enter a Google search such as:
obituary Clyde McIntyre 1999
This search returns the following:

I then recommended that we copy the URL line that was returned, and paste it into the URL box in the Add/Edit Favorite Site screen. Here is the broken down for size URL returned from this search:
“https://www.google.com/search”
“?q=obituary+clyde+mcintyre+1999”
“&rlz=1C1JZAP_enUS858US858”
“&oq=obituary+Clyde+McIntyre+1999”
“&aqs=chrome.0.69i59l2j69i60.17486j0j9”
“&sourceid=chrome”
“&ie=UTF-8”
There are four parameters in the “?q=” part of the search: obituary, Clyde, McIntyre and 1999. I then recommended that we edit this URL and replace the last three of these parameters with the codes which will tell AQ where to find the same information for the current AQ individual record. That would leave us with this URL, here broken down into its separate parts:
“https://www.google.com/search”
“?q=obituary+%%FN%%+%%LN%%+%%DY%%”
“&rlz=1C1JZAP_enUS858US858”
“&oq=obituary+Clyde+McIntyre+1999”
“&aqs=chrome.0.69i59l2j69i60.17486j0j9”
“&sourceid=chrome”
“&ie=UTF-8”
If we use this URL, AQ will examine it and replace the codes %%FN%%, %%LN%% and %%DY%% with the first name, last name and death year of your current AQ individual. That still leaves this string in the middle of the Google search:
&oq=obituary+Clyde+McIntyre+1999
…and that has nothing to do with a search for the obituary of a different person in our family file. It will still work, but I prefer the “cleaner” way of doing it:
https://www.google.com/search?q=obituary+%%FN%%+%%LN%%+%%DY%%
Just my personal preference. It seems a lot easier to understand, besides that is all Google needs to do the search.
Second: I have seen obituaries where the maiden name of a married female is never seen in the text. Those who submitted the obituary used only her married name and either didn’t or couldn’t list the names of her parents. That makes it harder to find her from AQ because her record in AQ is, by default, stored with her maiden name as her surname. Because of this, I recommend a second search for married females which looks like this…
https://www.google.com/search?q=obituary+%%FN%%+%%SLN%%+%%DY%%
…where %%SLN%% will be replaced with the surname of the spouse. But First lets create the Obituaty (Male or Unmarried) version of the Google search.
Beginning by clicking on the Internet tab…

…here is what the entire NEW process would look like:

Click Favorite sites. This will return the My Favorite Web Sites screen…

…where we click on the Add button. That gives us the Add/Edit Favorite Site screen…

…where we type the Title:
Obituary (Male or Unmarried)
and the URL:
https://www.google.com/search?q=obituary+%%FN%%+%%LN%%+%%DY%%
and click the Search this site check box. Now click the OK button. This returns us to the My Favorite Web Sites screen…

…where we click on Close. This returns us to our Edit Individual screen. Now for the obituary with no maiden name. Click on the Internet tab.

This brings up the Internet Menu:

Here we will click on Favorite Sites, which brings up the My Favorite Web Sites screen.

Here we click on Add, to bring up the Add/Edit Favorite Site screen.

We enter the Title:
Obituary (Married Female)
We enter the URL:
https://www.google.com/search?q=obituary+%%FN%%+%%SLN%%+%%DY%%
…where we are asking for the Spouse Last Name, and we click the Search this site check box. Now we click OK, which returns us to the My Favorite Web Sites screen…

…which shows us the two new entries. Click Close, and you are now set to go…
…well, almost.
Now that we have a way to find an obituary, what are we going to do?
Lets click on the Internet tab…

…and bring up the Internet menu.

We will click on Search Favorite Sites. This brings up the Search a Web Site screen…

…where we will highlight Obituary (Married Female) and click on the Perform Internet Search button.

This brings us the result of the Google search. There are three importrant things returned from this search. There is a link to an obituary at lindquistmortuary.com and a link to an obituary at legacy.com. (That’s two of the three. Note, I haven’t shown the third, but it will be here soon) We can use either of these obiruaries, however there is an advantage to using the legacy.com version. Legacy.com includes obituaries found on the websites of several mortuaries and several newspapers. This can simplify documenting the source of this obituary. Since Legacy.com doesn’t perform all the services of a mortuary or of a newspaper, they are a specialized business. They do obituaries. Their business is being a repository of obituaries. I believe they are a reliable source of permanent obituary retention. I will set up legacy.com as a repository. Click on the Edit tab…


…and click on Repository List. This brings up the Edit Repository List screen.

Note, I already have this repository, but I will show you how to create it. Type Legacy.com in the Repositories box and click on Add.

In the Define Repository Address box, enter the address of Legacy.com, then click the OK button. This will return you to the Edit Repositories List screen where you will click the Close button. Now ckick on the Edit tab…


…and click on Source List. I already have Legacy.com on my list, but you will need to type Legacy.com into the top box and click the Add button. This will take you to the Create Source screen. Mine already exists, so I will show you what to do by showing you what I did.

I clicked the Edit button to enter the link to the Legacy.com site. I clicked the Repository button to select Legacy.com as my repository, and I filled in the other fields as you see them. What you enter here is up to you. When you are finished, click the OK button. This returns you to the Create Source screen where you will click the OK button. In the Edit Source List click the Close button.
Now that you can get the obituary and show the source, where will you put it?

Click the Edit tab.

Click on Event Types. This brings up the Define Other Events screen. (You see the word Edit because I already had the Obituary (online) event type.)

Click on the Add Type button. This brings up the Define Other Event – User Defined screen.

I named this Obituary (Online) because I already had an event named Obituary which works differently. I selected a Single date as the only input because its sole purpose is to move the event to the bottom of the list. You will need to create an event sentence in the Sentence Usage area. You can copy this next line into it…
%(%2;%3) has an online obituary. (Click Edit then *Source to View the obituary)
…if it will make it easier for you. (or create some other sentence if you like)
All of the important information is stored in the Source of the Other Event. Lets add the event. Remember that we already did the Google search and found an obituary published by Legacy.com.

From the Other Events block on the Edit Individual screen, click on the Add button. This brings up the Select Event for… screen.

Scroll down to the Obituary (online) event and Select it. This will return the Obituary (online) – Individual screen.

Enter the date of the death or the burial date, then click the Source button. This brings up the Select Source for Obituary (online) screen.

Scroll down to the Legacy.com source and click the Select button. When we ran the Google search and returned the obituary, the URL line of that screen held the information we need. (I told you there were three important things.)

Copy it…

…and paste it into the Line/Page/Film# box, then click the Attach button. This brings up the Add Scrapbook Item… screen.

Open the Item Type pull down window and select Other. Paste the URL into the Filename or URL box, and click the OK button.

Note that the URL is now in the Atachment box and the Attach button now reads Edit. If you click the View button, the browser will display the obituary, and that was the whole point of all this. AQ is now storing the link to the online obituary for this individual. You can retrieve it by editing the Obituary (online) event and viewing the attachment in the source. Click the OK button, then click the next OK button.

Note that the Obituary (online) event is now added to the Other Events list, and the X shows that it has a source.
Find Find_A_Grave
In the Find-A-Grave post we talked about a way to document and source Find-A-Grave within Ancestral Quest. We started by saying that we need to either find the Find-A-Grave entry for an individual or create one if it isn’t already there. That leads to an interesting question. How can I go about finding an individual on Find-A-Grave from within Ancestral Quest? We will start by first finding someone from outside AQ. We will enter the following URL into our browser:
findagrave.com.
Our browser retruns the search screen with fields where we can enter search criteria. Here are those search fields:

First we will enter some search criteria:

Notice that the Find-A-Grave search form has a place for the first name and another place for the middle name. Ancestral Quest stores the surname in one place and all given names in another place. It is important to make note of this difference. Now we will click the Search button. Find-A-Grave finds the record we are looking for, but what we really want is the URL which Find-A-Grave created to do the actual search:

This is way too long, and therefore way too small to see, so to display what the URL looks like, we will highlight the URL line and type <CTRL> C to copy the URL. Below is the URL that was used, however the URL is too long to print it on one line, so I will break the URL into the individual parts:
https://www.findagrave.com/memorial/search
?firstname=Arley ———- We entered the first name Arley
&middlename=
&lastname=George ——- We entered the last name George
&birthyear=1917 ———- We entered the birth year 1917
&birthyearfilter=
&deathyear=1988 ——— We entered the death year 1988
&deathyearfilter=
&location=
&locationId=
&memorialid=
&mcid=
&linkedToName=
&datefilter=
&orderby=r ————— We did not enter the ‘r’ but since it is there we will leave it
&plot=
These parts placed side by side in the same order with no spaces between form the URL and the search key. Now how does this information help us? Lets look back at the Ancestral Quest Menu Bar:

Click on the Internet tab. This brings up the Internet Menu:

Click on Favorite Sites. This will bring up the My Favorite Web Sites screen:

As you can see, I already have two FindAGrave sites named. One is used to search for males and unmarried females. The other searches for married females. By default, Ancestral Quest saves females under their maiden name. Married females are typically added to Find-A-Grave under the surname of their husband. Searching for a married female under her maiden name usually fails.
Please note that each site name in the My Favorite Web Sites screen is followed by either a P or an S. The P tells Ancestral Quest that the URL can be passed to the browser without inserting any values from the record of the currently highlighted person in AQ. Those with an S will be inserting values into the search string before passing it to the browser. Now click on the Add button. This brings up the Add/Edit Favorite Site screen:

As you can see, I am showing you how I created the search for males and unmarried females. I have copied the URL that Find-A-Grave returned to us into the URL field in the Add/Edit Favorite Site screen. Note that I have also placed a check in the Search this site check box to show AQ that it must place values from the current Individual record into the search string.
Look at the list of parameters in the center of the Add/Edit Favorite Site screen. Compare what you see there with the information returned in the URL line of the screen that Find-A-Grave returned to us. They returned ?firstname=Arley and our parameter list has both %%FN%% – First Name (All Given Names) and %%FO%% – First Given Name Only. Find-A-Grave stores the name ike this:
Arley______________________ First Name
Wallace____________________ Middle Name
George_____________________ Last Name
Ancestral Quest stores the name like this:
Arley Wallace______________ Given Names
George_____________________ Surname
%%FN%% tells Ancestral Quest to place Arley Wallace in the search string, but Find-A-Grave has neither a First Name nor a Middle Name equal to Arley Wallace. The %%FO%% tells Ancestral Quest to take only the Arley part of the Given Names and place that into the search string.
Serious genealogists would never store the name of Robert Winsloe Allen as Bobby Allen in their AQ file, so it is a good idea to store the name pretty much the way it would be listed on a birth certificate. The name Bobby will probably never match anything in a search if it should have been Robert.
Of the fifteen possible parts of the search string, we used only four, yet that was enough for Find-A-Grave to find our record.
So far we have copied the URL returned to us by Find-A-Grave into the URL field, but not everyone in our file is named Arley George, and they weren’t all born in 1917, and they didn’t all die in 1988. We need a way to tell AQ to take those corresponding parts of our current Individual record and place them into the search string, no matter what the names and dates are. That is why we have that list of parameters. We need to search through the URL and replace the names and dates with the codes which tell AQ to find that information from our currently active individual and place it into the search string:

Here is the first name Arley, which we had entered into the Find-A-Grave search form. Here we need to substitute the name with a parameter so that Ancestral Quest will know what information to place in that part of the search string:

Instead of Arley we will enter %%FO%%. This tells AQ to place only the first part of the given name of the current individual in this place. We continue looking to the right in the URL:

Here is where we find George, the surname, and 1917, the birth year:

In place of George, we will enter %%LN%% so that AQ will know to place the surname from the current record here. We will substitute 1917 with the code %%BY%% so that AQ will insert the birth year here. We keep moving to the right:

Here we find 1988, his death year:

We replace it with %%DY%% then we move to the bottom of the screen and click the OK button, and AQ adds FindAGrave (Male or Unmarried) to the list of possible Favorite Site searches.
Now we will go back to FindAGrave.com and enter Arley’s wife Evaleen Hulet:

We will leave the Middle Name and Cemetery Location fields blank, and click on the Search button. Find_a_Grave is unable to find her record because at the time of her death she was entered into Find-A-Grave as Evaleen George. We need to tell AQ to use the surname of her husband instead of her maiden name. Here are the steps we take as we copy the URL that Find-A-Grave just returned to us. If we look at the individual parts of the URL, they look like this:
https://www.findagrave.com/memorial/search
?firstname=Evaleen ——- We entered the first name Evaleen
&middlename=
&lastname=Hulet ——— We entered the last name Hulet
&birthyear=1924 ———- We entered the birth year 1924
&birthyearfilter=
&deathyear=2021——— We entered the death year 2021
&deathyearfilter=
&location=
&locationId=
&memorialid=
&mcid=
&linkedToName=
&datefilter=
&orderby=r ————— We did not enter the ‘r’ but since it is there we will leave it
&plot=
We will copy this URL into the URL: field in the Add/Edit Favorite Site screen. These are the things we see as we scan and update that URL:


Here we will replace Hulet with a different code. We will use %%SLN%%, which means spouse’s last name. The rest of the replacements are the same as we did before:


We go to the bottom of the screen and click the OK button, and AQ adds FindAGrave (Married Female) to the list of favorite sites.
Find-A-Grave
Recently in AncestralQuest@groups.io there was a question about automatically exrtracting the Find-A-Grave memorial number so that it could be added to an individual record in AQ. I’m guessing that would require a contractual arrangement between Incline Software and Find-A-Grave, and probably program changes for both programs, so I won’t comment on that here.
I too extract Find-A-Grave memorial numbers, and I do it manually. You may find it interesting to see one example of what can be done with that information.
This process requires some prepratory work. First, if you don’t already have FindAGrave.com in your list of sources, you will need to create it. It should look something like this:

Next, if you don’t already have one, you will need a FindAGrave.com event type. It could look like this:

Selecting a single Date and a single Description will allow you to use an easily constructed Event Sentence like the one above. The Date is used to push the event to the bottom of the event list. If you want to store more information in the Event, It will be more difficult to form the event sentence. For help with Custom Event Sentences click this link.
Next find the person you want in Find-A-Grave. The Find-A-Grave search form is quite different from what it was back when I posted Build an Internet Search, but it is still possible to search Find-A-Grave from within AQ, but that’s another story. If the person is not there, go ahead and add the person. You will want to copy down the memorial number, and the URL for that person’s Find-A-Grave page. You will also want the burial date or if that’s not known, you will want the death date.
Now we are ready to add the FindAGrave.com Event, so go ahead and edit the individual. At the bottom of the Edit Individual screen you will see the Other Events block:

Click on the Add… buton. This will bring up the Select Event for (individual) Screen:

Slide down to FindAGrave.com and click it once to highlight it, then click the Select button. This will bring up the FindAGrave.com event entry page:

Enter the Burial Date or the Death Date, then copy the memorial number to the Description. Now click on the Source… button. This will bring up the Select Source for FindAGrave.com screen:

In the Select Type box, slide down to Internet and click it. In the Listing Sources of Type: Internet box slide down to FindAGrave.com and click it. Now click the Select box. This will open the Source Citation screen:

Copy the memorial number to the Vol/Page/Film # box. Set the Quality to 2. Click the Event radio button, then click the Attach… button. This will bring up the Add Scrapbook Item screen:

Open the Item Type pull down window and select Other. Copy the URL of your individual’s Find-A-Grave page to the Filename or URL: box, and click on the OK button. This will return you to the Source Citation screen:

Here you will see the URL in the Attachment box. Click the OK button. This will return you to the FindAGrave.com event entry page:

There is now an asterisk on the Source button. Click the OK button to save all you have done. This returns you to the Edit Individual screen:

In the Other Events box there is now a FindAGrave.com event. The burial or death date you entered has pushed it to the bottom of the box. The description shows the memorial number, and the X at the end tells you that this event has a source. Now click the Edit… button. This returns you to the FindAGrave.com event entry page:

Click the Source button. This returns the Source Citation screen:

Here you can click the View button. AQ will pass the URL for your individual’s Find-A-Grave memorial page to your browser, and your browser will return the Find-A-Grave page.
Sharing Events Another Way
In RootsTech 2021 Gaylon Findlay teaches a method for sharing events and their sources. It is located HERE. (Click This Link) It’s only 8 minutes long.
When I asked Gaylon some questions about this video, he said, “There are probably a thousand good ways to document this, and very few bad ways.” I have a lot of respect for Gaylon and for AQ. After a lot of thinking, I came up with far fewer than 10 ways. I’ll keep thinking about it though. If I find something good, I’ll post it on AQWillDo.
Meanwhile, this is one of the ways I thought of, and I like it. You may too.
Whenever I try something new or big or complicated, I like to make a backup of my file before I begin. Backups are inexpensive when compared to the alternative. They finish quickly and they are small. With a backup if I do something wrong, and I don’t know how to correct it or if I don’t want to spend the time and effort it would take to correct it, I can always restore the backup and start again.

Just a hint though! For this type of backup I alter the backup title. Normally, because of the settings I chose in
Tools -> Preferences -> Database, a backup of this file would be named
DeleteThisExampleFile 2021-03-20, 08-56.aqz
DeleteThisExampleFile 2021-03-20, 08-56 B4 Big Change.aqz
is what I would call it before a big change. The B4 part lets me quickly pick this backup from a list of backup files.
I believe that I learn faster by doing than by just observing, so this is a hands on lesson. Open your family file…
…and back it up. Lets get started.
Since I have done a less than stellar job of documenting my family file, I foresee this as a long project. Because of this, I want a way to identify people after I have searched for them on each census which occurred any time while they were Head of household. I will identify them using a Tag. That tag will be visible in the ‘Family’ view, the ‘Pedigree’ view and the ‘Descendants’ view.
That’s right. I will begin this project by selecting the people on my family file who are shown on a census as the ‘Head’ of house. (HoH) Each record of a residence in the census begins with a person almost always listed as ‘Head’ of the house. In some cases, such as an orphanage, this person is listed as ‘Officer’ ‘Matron’ or some other designation instead. Someone, however, is always listed first, and we will refer to that person as the ‘Head’ of the household.
The reason for beginning with people who are listed as ‘Head’ is to avoid duplication. In any given census year, a person will be listed as ‘Head’ ‘Spouse’ ‘Son’ ‘Daughter’ or some Other designation. I refer to those with an Other designation as Tenants. (That would be Grandma, Grandpa, Aunt, Uncle, Brother, Brother in law, Sister, Sister in law, Cousin, Neighbor, Friend, Employee, Unknown, Not Related, etc.) That’s everyone who would not be on the Family Group Record for the HoH and the Spouse shown in the ‘Pedigree’ view. It would be very unusual for one person to be listed as both ‘Head’ and also as anything else in one census year. (In the case of multiple marriages, you may or may not want to document other spouses and family.) Such a person would have to have, and be counted in, more than one residence. People on a census, but not listed as ‘Head’ will live in a residence where someone else is ‘Head’ and they will be counted at that residence in that census year.
Since we use the ‘Pedigree’ view to select our candidates for ‘Head’ of house, these are direct ancestors. We will start at the right of the pedigree and move left to right and top to bottom. That means we will be checking for both males and females to see if they are listed as ‘Head’ of house. If a person is found as anything other than ‘Head’ during any census year, we will not process that person in that residence. We will account for that person in that year by finding them in the residence where someone else is the ‘Head’ of house that year. I will begin with my dad because at age 74, I am too young to be on the most recent, US 1940 Census, so even though all my children have moved away, I am not yet HoH on any census that has been released. That will be true for almost all of you. (Add 72 to your age when you were first HoH in a census and see how old you would have to be.)

Click on ‘Tools’ and select ‘Tags…’ from the menu.

Click on the ‘Show Tag Placeholders’ checkbox to fill it with a check. This makes working with Tags easier. You can access Tags without going to a menu. Just one click on either a tag or a tag placeholder, and you are there. Click the ‘Define Tags’ button.

Select an unused tag and name your tag ‘HoH Census Search Completed’ and then make a ‘No Census Records Found’ tag while you are at it.
When you have searched for all of the census records for a person, locate that person in ‘Pedigree’ view, the ‘Family’ view or the ‘Descendants’ view.

Click on the tag placeholder or an existing tag.

AQ will bring up the ‘Manage Tags’ screen. Click on the ‘HoH Census Search Completed’ tag, then click on the ‘Set’ button for the selected person.

Since I will be looking at many families, I need a system which is orderly and inclusive, and I want to track my progress. As such I will use my ‘Pedigree’ view as my primary guide. As an overall rule I will search households from left to right and top to bottom on the ‘Pedigree view. If Dad is in a census, but not Head of Household, he will be a spouse, a child, or a tenant where someone else is the Head of Household. In theory, everyone should appear on a census in one of these positions if they are living at the time of the census. The reason for only processing a census for the chosen person if he/she is HoH is to avoid duplication. If he/she is not HoH that year, then he/she should appear in another household where someone else is HoH, and he/she will be counted there.
As the process travels from the top to the bottom of the ‘Pedigree’ view, we will be looking for both males and females as HoH. Process her census record whenever she is shown as HoH. HoH is a gender neutral position in the census. Note that in the image above, I do not process my mother, nor either of my grandmothers. This is NOT because they are female, but because in the latest census available, the US 1940 Census, they were listed as Spouse because their husbands were still alive.

Just before I begin searching for the census records of my great-grandparents, My ‘Pedigree’ view will look like this. Three are red-tagged because I searched them, one because I am too young and three because I knew they were never HoH before the 1950 census, which is not available as of this writing.
In his video, Gaylon Findlay teaches us how to use event sharing and the freeform source as a means to shorten the time and effort required to document the information found on a census for a particular household. Typically this would be a family, but often it includes others living in the house. In this lesson we will create a Census event and verify the Date and Location using the US Census as the source. We will then share this Census event with all of the residents in the household, be they family or tenants, as long as they are found somewhere on our family file. I use the Census event rather than the Residence event to demonstrate the versatility of the sharing process. Gaylon has shown the use of the Residence event. I also use the Census event because I more closely associate the Census Source with the Census Event.
It is a really good idea to have your family file open in AQ, have this lesson open in your browser, and have a separate window or tab for the internet searches you will be doing. Your browser can separate this lesson from the internet searches either with tabs or by pulling one of the tabs to a separate window. It really helps to be able to find all three quickly using the icons on the taskbar or the tabs in the browser.

I highlight my father then click on the Internet tab and select ‘Search Ancestry.com’ to do a General Search. In this lesson all of the searches will be to Ancestry.com. You could search elsewhere, like FamilySearch, but then the process would vary from what is shown here. I’ll leave it up to you to first learn how to do the process, then figure out the differences for yourself. Just a hint: If you intend to use more than one vendor for your searches, and you intend to switch between vendors in a given census, you will need to copy both types of citation information (Demonstrated later) each time you switch vendors in that census. You will also need to change Repository information if you are tracking that.

Ancestry.com returns this general search of my father. Note that there is a link to a record which shows his name, the name of his father, but with his mother’s maiden name, and his daughter’s name. That must be him? We will click on that link to see if it is.

This screen was returned by the search, and surprise, it really is him. Note that on the right side of the screen there is a column labeled Suggested Records. The third entry in that column is for the US 1940 Census, where Dad was the Head of House. There may be many links to your chosen person in this column, so take a few seconds to scroll down and see if you can find census records for the years when your person may have been HoH. We will click on that third Suggested Record link.

This is what we were looking for. It is the transcript of the US 1940 Census. He is the HoH in this census record. Often, as is the case here, there is a link to a photo of the actual census page. We will right-click this link because we are going to use the URL for this transcript page later. I want to be able to switch back and forth between the transcription of the census page and the photo of the census page.
Did you find a census record as HoH for your first person? If not, try the next person in order from your ‘Pedigree’ view and search until you do, then continue with us. Remember to tag any for whom you have made a complete search whether you found the results you wanted or not.

At the top of the census page photo we find the information which we will now enter into our Census event.

I don’t have a 1940 census event for Dad so I click the ‘Add’ button. In the next window (superimposed) I highlight the ‘Census’ event and click the ‘Select’ button. If for some reason I already had a ‘Census’ event for that year, I would probably want to Edit it so I could determine whether it had everything I need. If it doesn’t I can delete that event and build a new one following the instructions below.

I enter the Date and Place information from the census, and I click on the Source’ button.

A little history here. Several years ago when I was just figuring out how to do ‘Events’ and ‘Sources’ I decided to pre-build all of the census sources I was likely to need. I Googled to find what census information was available in each country I expected to use. I didn’t take the time to get all the citation information for each census. I figured I could wait until I actually needed a particular country and year, and fill it in then. That’s working out well.
But, for this lesson I wanted to show how to build the event and the source, so I deleted what I already had for the US 1940 Census source from the Source List. That’s why the most recent census is the only one that’s not there for the US. I guess I could remove the Scotland 2001 Census and the Scotland 2011 Census from my list because those records will not be released until after the year 2100.

This is where we create a source. The steps are numbered.
1st, I make sure that the source type is Census.
2nd, I assign a level of relative quality to the event. I have been generous. The person who answers the questions may not be the Head or Spouse, or in some cases not even a family member. The census taker may not know anyone at this residence. Sometimes people change how they spell their names, or can’t remember what year some of the children were born. Sometimes it’s the census taker who can’t spell. My sister had an alternate spelling for her given name until sometime in grade school. As long as I have been alive she has never spelled it the way it was correctly spelled on the 1940 census. If you have much experience with census records, you already know about these types of things.
3rd, I like things to be consistent! There are a few different ways to title a census. I could have said:
Census 1940 US
or
Census US 1940
That would work, but AQ already lets me filter by type so that I see just the type I want to choose from. In this case, Census. I could have said:
1940 US Census
That would work, but then the list would be grouped together by year and sorted within year by country. A long list of little clumps of records from around the world.
1940 Census US
That would actually give me the same list as 1940 US Census. That leaves:
US Census 1940
or
US 1940 Census
Country Year Type. That’s what I like, so I built them all into the Source List at once so that I wouldn’t slip up and change the order later. Now I can find a census source for a particular year from any country in moments. You don’t need to do all that. It’s just my Obsessive Compulsive Tendency, not Disorder, I can still function normally without doing these things.
4th, I click in the Short Title box, and AQ copies down what I have entered as the Title. Next, if needed, I go back up and add little extra bits of information to the title. Go back 2 images and look at the Edit Source List. Notice that it is sorted by Full Title. Here is the same list sorted by Short Title.

Now where were we? Oh, Yes!
5th, there is a ‘Repository’ button. If you click it, you will have the option of selecting from items you have already placed on the ‘Repository List’ or you can add a repository. You can read about Repositories in the User’s Guide. A repository helps someone else find where you found your information.
6th, click on the ‘Freeform’ checkbox, then do this:

Scroll to the bottom of the Census transcript and copy the ‘Original Data’ text.

Paste the text into the ‘Full Reference’ box then click the ‘OK’ button. This will put the US 1940 Census into your Source List.

Scroll to the bottom of the Census transcript, and copy the ‘Census Place’ text from the ‘Source Citation.’

Now that the US 1940 Census is in the list, you can click the ‘Select’ button.

Enter the – Name comma Head of House comma space – then paste in the rest of the information which you just copied. As you do, the information in the ‘Sample Footnote’ box will also change. There you can see the citation in its final form.
The US 1940 Census source already contains the information you first copied five images ago from the ‘Original data’ area of the ‘Source Citation’ so you will not need to copy that again. From now on when you cite the US 1940 Census for another household, you will just copy the information from the ‘Census Place’ and paste it after the ‘Name comma Head of House comma space ‘ which you will enter.
Click the ‘Attach’ button.

I told you that we would use the URL from our Census transcript. In this window, use the ‘Item Type’ pull down window to select the word Document, copy the URL from the top of the Census transcript screen, and paste it into the ‘Filename or URL’ box, then click the ‘OK’ button.
You could have done that a different way. You could have done a screen shot of the census page, saved that image where you keep the rest of your images, and left the word Photo in the ‘Item Type’ pull down window. Then you would place the path and file name for that image into the ‘Filename or URL’ box. The difference is that the ‘Document’ version references a URL and the ‘Photo’ version references an image.

Now you see the ‘Attachment’ window is not empty. If you click the ‘View’ button, AQ will display the census page, either as a photo or a web page. Click the ‘OK’ button.

Now there is as asterisk on the ‘Source’ button, showing that there is a source for this event. It’s time to share this event with everyone else who is on that census page.

We are going to add the family of the HoH, so click the ‘Add Family’ button.

We don’t want the family of the HoH when he/she was a child, so we select the family where the HoH is shown with the Spouse who is the parent of the children on the Census page.

In this case two of the children were not born yet at the time of the census, so we will uncheck their names. If an older child or the spouse had died before the census, we would also uncheck those names.
If there are others on the census page who are not in the family you selected, you can use the ‘Add Selected Individuals’ button to access them using the Advanced Filter/Focus, and also share the event with them.

The event is ready to be shared, so we click the ‘OK’ button and continue our journey through our ‘Pedigree’ view. If there are other censuses where this person is HoH, process them the same way you did this one. If not, click on the Tag Placeholder or an already existing tag for the HoH, and highlight the ‘HoH Census Search Completed’ tag and click the ‘Set’ button.

It’s up to you how many of your relatives you want to document with census records. Please note that what we have done in the ‘Pedigree’ view search includes only direct ancestors and their immediate families. With the possible exception of others who resided with the HoH, and are also on the Family File.
When you move far enough along the ‘Pedigree’ view that you reach a person who has no census records, check the parents to be sure they have none either, then tag that first one with a ‘No Census Records Found’ tag. Maybe a check for the earliest census records in their area would tell you why.
If you want to be thorough, I suggest that you choose this next approach after you finish with your ‘Pedigree’ view search. Search the term “Census years in ______’ and fill in the blank with the name of a country, or other area, where you have ancestors. There is no need to search for ancestors who died before census records existed where they lived.
Try this. During your ‘Pedigree’ view search, you tagged some ancestors with the ‘No Census Records Found’ tag. For each of them select the ‘Descendant’ view. From here on, use the ‘Descendants’ view as your guide. Travel down the ‘Descendants’ view generation by generation just as you traveled up the ‘Pedigree’ view. Level 1 is children and their spouses. Level two is Grandchildren and their spouses, level 3 is great-grandchildren and their spouses. You decide how many generation levels you want to process. Remember that you still process only those years when they are ‘Head’ of their household. As you complete the descendants for each ancestor with a ‘No Census Records Found’ tag, remove that tag and move to the next ‘No Census Records Found’ tagged ancestor.
Are you young enough to complete this task?
What topic would you like to see next?
Virtual Booth Tour 2021
This was a first. RootsTech was totally virtual. Over a million people registered to participate.

Ancestral Quest was a Bronze Sponsor of the event.

In RootsTech 2021 AQ had a Virtual Booth filled with information and ideas. If you have ever wanted to know how to use Ancestral Quest more effectively, this is a great place to look. Below is a guided tour of the RootsTech Ancestral Quest experience. Here Gaylon Findlay examines in detail many of the things AQWillDo. RootsTech has indicated that these links will be available until they are replaced by RootsTech 2022, so use the available time wisely. If the number to the left of the video link is highlighted, then that number is a link to the discussion of the video in AQWillDo. Click the highlighted number to see the discussion.
Group. . . . . . . . . . . . . . Category
RootsTech 2021 . . . . . 1 RootsTech 2021 Available through most of 2021
Ancestral Quest . . . . . 1 Ancestral Quest Virtual Booth
Booth Demos . . . . . . . 1 Ancestral Quest-Family Tree Software (Overview) 4:58
Booth Demos . . . . . . . 2 Timelines to Assist Research-Complete Guide 9:01
Booth Demos . . . . . . . 3 Fan Charts – Created by Ancestral Quest 4:25
Booth Demos . . . . . . . 4 TreeTips – Research Assistance Built into AQ (Full Guide) 19:57
Booth Demos . . . . . . . 5 TreeTips Research Assistance (Case Study) 16:57
Booth Demos . . . . . . . 6 Research Assistance Tools of Ancestral Quest 10:37
Booth Demos . . . . . . . 7 Sync Family Search and Your AQ Family File 19:09
Booth Demos . . . . . . . 8 Sync FamilySearch & Your AQ File Using Ancestral Quest 8:13
Booth Demos . . . . . . . 9 Freeform Sources 8:43
Booth Demos . . . . . . . 10 Sharing Events and Sources 7:55
Booth Demos . . . . . . . 11 Background Images for Charts 4:57
Booth Demos . . . . . . . 12 Intro to Syncing Sources from FamilySearch 4:58
Booth Demos . . . . . . . 13 Memories Manager in Ancestral Quest 9:25
Booth Demos . . . . . . . 14 Color Coding in Ancestral Quest 7:29
Booth Demos . . . . . . . 15 Add/Remove Country Name in Place Names 2:36
Booth Demos . . . . . . . 16 Ancestral Quest in Other Languages 3:15
Booth Demos . . . . . . . 17 Mapit 2:34
Discover More . . . . . . 18 Ancestral Quest Program Description
Discover More . . . . . . 18-1 Feature List
Discover More . . . . . . 18-2 Ancestral Quest for Mac
Discover More . . . . . . 18-2-1 Not Authorized (Mac)
Discover More . . . . . . 18-3 Version History
Discover More . . . . . . 18-4 View the System Requirements
Discover More . . . . . . 18-5 Details on the Free AQ Basics
Discover More . . . . . . 18-6 Purchase Ancestral Quest
Discover More . . . . . . 19 Learning Center See —-> (What Will AQ Do?)
Discover More . . . . . . 20 PAF User Information
Discover More . . . . . . 20-1 More Info
Discover More . . . . . . 20-2 Ancestral Quest Basics (Free Version)
Discover More . . . . . . 20-3 Options to Work with PAF
Discover More . . . . . . 21 Discover More
Discover More . . . . . . 21-1 Value of a Personal Database Part II: Case Study 17:12
Discover More . . . . . . 21-2 Syncing AQ/PAF Data with Family Tree (Basics) 28:49
Discover More . . . . . . 21-3 Syncing AQ/PAF Data with Family Tree (Advanced)
Discover More . . . . . . 21-4 Translating Ancestral Quest Screens 4:26
Discover More . . . . . . 21-4-1 Overview 1:06
Discover More . . . . . . 21-4-2 Create Language File 1:06
Discover More . . . . . . 21-4-3 Example 1 – Buck/Doe 2:48
Discover More . . . . . . 21-4-4 Organization of Translation Screen 11:58
Discover More . . . . . . 21-4-5 Example 2 – Contact Info 4:03
Discover More . . . . . . 21-4-6 Example 3 – Family View 13:04
Discover More . . . . . . 21-4-7 Example 4 – Multiple Layouts 1:25
Discover More . . . . . . 21-4-8 Example 5 – Pedigree Chart 4:06
Discover More . . . . . . 21-4-9 Installing a Language File 2:49
Discover More . . . . . . 21-4-10 Sharing a Language File 3:34
Discover More . . . . . . 21-4-11 Handling Updates 10:40
Discover More . . . . . . 21-4-12 Advanced Topics 17:45
Discover More . . . . . . 21-4-13 Summary 0:55
Discover More . . . . . . 22 Online Brochure
Discover More . . . . . . 23 Cues and Clues for AQ (Blog)
Discover More . . . . . . 24 Ancestral Quest Basics to Ancestral Quest Comparison Chart
Keep watching to see which white numbers will be highlighted.
If you do not yet follow AQWillDo, look to the right and scroll to the box labeled ‘Follow AQWillDo’ and click it. Follow the directions and receive each new posting.
What Will AQ Do?
If you are a Follower of AQWillDo then you probably agree with me that Ancestral Quest is a Great Genealogical (Family History) program. It’s great enough that other programs got their start by licensing the Ancestral Quest code as the base for their own program. PAF (Personal Ancestral File) switched from an MS-DOS program to a Windows program this way. You may also have heard about Ancestry.com. Similar story.
AQ was the first desktop genealogy program to pass all the tests, and certify for use with FamilySearch.
So, how well do you know Ancestral Quest? Did you know that there is a Learning Center in AQ? This Learning Center can help you to learn what AQWillDo.
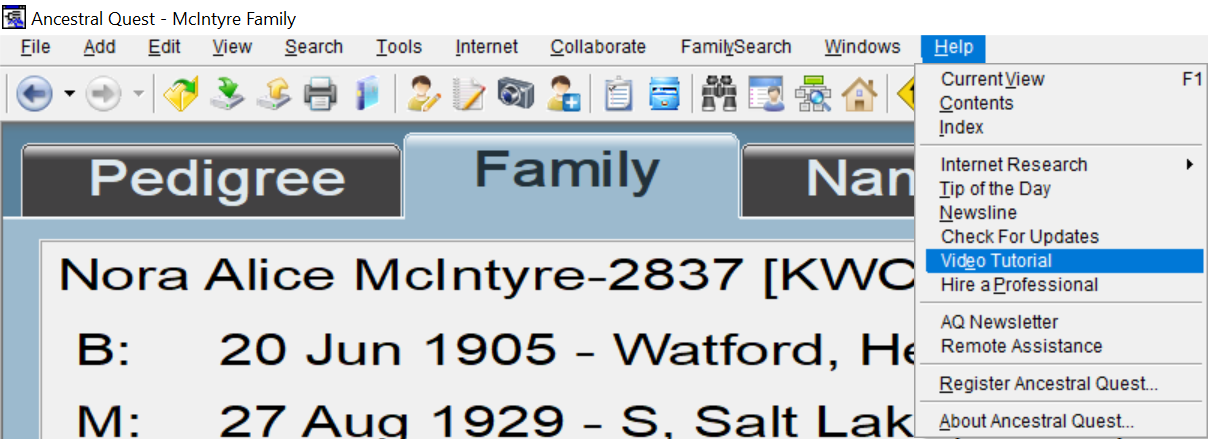
Click on the Help tab and select ‘Video Tutorial’ from the menu.

Open your copy of AQ and find the Learning Center. Scroll down to see how much is available. And what you see, that’s not all. Some of the links on the Learning Center page lead to other pages which themselves have links. It can get confusing, so here is a list of links to most of the videos, instruction pages and recorded classes found through the Learning Center as of 11 Mar 2021. I hope I didn’t miss any. These are clickable links, so try them out. If the number to the left of the video link is highlighted, then that number is a link to the discussion of that video in AQWillDo.
Group. . . . . . . . . . . . . . . . . . . . . . Category
Learning Center . . . . . . . . . . . . 1 Learning Center
Other Resources . . . . . . . . . . . . 1 Feedback
Other Resources . . . . . . . . . . . . 1 FAQs
Other Resources . . . . . . . . . . . . 2 Tips & Tricks
Other Resources . . . . . . . . . . . . 2-1 Using Removable Media
Other Resources . . . . . . . . . . . . 2-2 Where to Find Genealogical Information
Other Resources . . . . . . . . . . . . 2-3 Wall Chart
Other Resources . . . . . . . . . . . . 2-4 Pruning and Grafting your Tree
Other Resources . . . . . . . . . . . . 2-5 Documenting Your Sources
Other Resources . . . . . . . . . . . . 2-6 Sharing Your Family Made Easy
Other Resources . . . . . . . . . . . . 2-7 Quick Data Entry
Other Resources . . . . . . . . . . . . 2-8 Organizing Your Paper Files
Other Resources . . . . . . . . . . . . 2-9 Entering Special Characters (Win/Mac)
Other Resources . . . . . . . . . . . . 2-10 Upgrading to AQ 16 from Earlier Versions
Other Resources . . . . . . . . . . . . 2-11 AQ – Uninstall & Reinstall
Other Resources . . . . . . . . . . . . 3 YouTube Channel
Other Resources . . . . . . . . . . . . 4 AQ 16 Features
Other Resources . . . . . . . . . . . . 5 AQ 15 Features
Other Resources . . . . . . . . . . . . 6 AQ 14 Features
General . . . . . . . . . . . . . . . . . . . . 1 Overview Video Tutorial
General . . . . . . . . . . . . . . . . . . . . 2 Quick Start Video Tutorial
General . . . . . . . . . . . . . . . . . . . . 2-1 Overview
General . . . . . . . . . . . . . . . . . . . . 2-2 First Time Startup Screens
General . . . . . . . . . . . . . . . . . . . . 2-3 Quick Start – Entering a Family
General . . . . . . . . . . . . . . . . . . . . 2-4 Individual Entry
General . . . . . . . . . . . . . . . . . . . . 2-5 Family Entry Revisited
General . . . . . . . . . . . . . . . . . . . . 2-6 Importing a GEDCOM File
General . . . . . . . . . . . . . . . . . . . . 2-7 Working with Sources
General . . . . . . . . . . . . . . . . . . . . 2-8 Scrapbooking
General . . . . . . . . . . . . . . . . . . . . 2-9 Backup and Restore
General . . . . . . . . . . . . . . . . . . . . 2-10 Conclusion
General . . . . . . . . . . . . . . . . . . . . 3 Video Interview at Mesa Family History Expo – 2013
General . . . . . . . . . . . . . . . . . . . . 4 TreeTips Research Assistance (Complete Guide)
General . . . . . . . . . . . . . . . . . . . . 5 TreeTips Research Assistance (Case Study)
V16 Features. . . . . . . . . . . . . . . . 0 AQ 16 Features
V15 Features. . . . . . . . . . . . . . . . 0 AQ 15 Features
V14 Features. . . . . . . . . . . . . . . . 1 AQ14 Video Tutorial
V14 Features. . . . . . . . . . . . . . . . 2 AQ14 New Features
V14 Features. . . . . . . . . . . . . . . . 3 Update AQ14 Screenshots
Classroom. . . . . . . . . . . . . . . . . . 1 Organization of these Training Videos
Classroom. . . . . . . . . . . . . . . . . . 2 Setting a Password on AQ
Classroom. . . . . . . . . . . . . . . . . . 3 Finding People and Defining Groups
Classroom. . . . . . . . . . . . . . . . . . 4 Getting Help with AQ
Classroom. . . . . . . . . . . . . . . . . . 5 Printing Descendant Charts/Viewing Descendants
Classroom. . . . . . . . . . . . . . . . . . 6 Analyzing Relationships
Classroom. . . . . . . . . . . . . . . . . . 7 Setting Home Person and Using Bookmarks
Classroom. . . . . . . . . . . . . . . . . . 8 Printing Large Charts
Classroom. . . . . . . . . . . . . . . . . . 9 Source Images
Classroom. . . . . . . . . . . . . . . . . . 10 Updating AQ
Classroom. . . . . . . . . . . . . . . . . . 11 Family Reunion Contacts
Classroom. . . . . . . . . . . . . . . . . . 12 Report and Chart Destinations
Classroom. . . . . . . . . . . . . . . . . . 13 Opening Multiple Databases
Classroom. . . . . . . . . . . . . . . . . . 14 Potpourri
Classroom. . . . . . . . . . . . . . . . . . 15 Publishing a Family Book
Classroom. . . . . . . . . . . . . . . . . . 16 Uploading Pictures to Internet
Classroom. . . . . . . . . . . . . . . . . . 17 What do Dual Dates ie 1701/1702 Mean?
Classroom. . . . . . . . . . . . . . . . . . 18 Backups and Collaboration
Recorded Classes. . . . . . . . . . . . 1 Syncing AQ/PAF Data with Family Tree (Basics)
Recorded Classes. . . . . . . . . . . . 2 Using AQ as a Research Tool
Recorded Classes. . . . . . . . . . . . 3 Syncing AQ/PAF Data with Family Tree (Advanced)
Recorded Classes. . . . . . . . . . . . 4 Questions and Answers
Recorded Classes. . . . . . . . . . . . 5 New Features in AQ14
Recorded Classes. . . . . . . . . . . . 6 Finding, Reserving and Tracking LDS Ordinances
Recorded Classes. . . . . . . . . . . . 7 General Questions
Recorded Classes. . . . . . . . . . . . 7-1 Setting a Password on AQ
Recorded Classes. . . . . . . . . . . . 7-2 Tips on Speeding up Imports from Family Tree
Recorded Classes. . . . . . . . . . . . 7-3 Syncing Notes between your AQ/PAF file and FSFT
Recorded Classes. . . . . . . . . . . . 7-4 Syncing Sources between your AQ/PAF file and FSFT
Recorded Classes. . . . . . . . . . . . 8 Finding People / Defining Groups
Recorded Classes. . . . . . . . . . . . 8-1 Finding People and Defining Groups
Recorded Classes. . . . . . . . . . . . 8-2 ORTS Tips – Ordinance Reservation and Tracking System
Recorded Classes. . . . . . . . . . . . 8-3 Getting Help with AQ
Recorded Classes. . . . . . . . . . . . 8-4 ORTS Tips – Ordinance Reservation and Tracking System
Recorded Classes. . . . . . . . . . . . 8-5 Importing Family Lines from Family Tree
Recorded Classes. . . . . . . . . . . . 8-6 Handling Changing PIDs of FamilySearch
Recorded Classes. . . . . . . . . . . . 8-7 Printing Descendant Charts / Viewing Descendants
Recorded Classes. . . . . . . . . . . . 9 Analyzing Relationships / General Questions
Recorded Classes. . . . . . . . . . . . 9-1 Analyzing Relationships
Recorded Classes. . . . . . . . . . . . 9-2 Setting Home Person and Using Bookmarks
Recorded Classes. . . . . . . . . . . . 9-3 Automatically Link All Records with FamilySearch
Recorded Classes. . . . . . . . . . . . 9-4 Printing Large Charts
Recorded Classes. . . . . . . . . . . . 9-5 Handling LDS Ordinances
Recorded Classes. . . . . . . . . . . . 9-6 Source Images
Recorded Classes. . . . . . . . . . . . 9-7 Updating AQ
Recorded Classes. . . . . . . . . . . . 10 Family Reunion / Family Books / Photos to Internet
Recorded Classes. . . . . . . . . . . . 10-1 Organization of Training Videos
Recorded Classes. . . . . . . . . . . . 10-2 Family Reunion Contacts
Recorded Classes. . . . . . . . . . . . 10-3 Report and Chart Destinations
Recorded Classes. . . . . . . . . . . . 10-4 Opening Multiple Databases
Recorded Classes. . . . . . . . . . . . 10-5 Potpourri
Recorded Classes. . . . . . . . . . . . 10-6 Publishing a Family Book
Recorded Classes. . . . . . . . . . . . 10-7 Uploading Pictures to Internet
Recorded Classes. . . . . . . . . . . . 10-8 Answering Questions Before Reserving LDS Ordinances
Recorded Classes. . . . . . . . . . . . 11 Standardized Place Names (FamilySearch)
Recorded Classes. . . . . . . . . . . . 11-1 Selecting Standardized Places for FSFT
Recorded Classes. . . . . . . . . . . . 11-2 What do Dual Dates ie 1701-1702 Mean?
Recorded Classes. . . . . . . . . . . . 11-3 Backups and Collaboration
Recorded Classes. . . . . . . . . . . . 11-4 Get a List of Ancestors Who Turned 110 Years Last Year
Recorded Classes. . . . . . . . . . . . 11-5 Potpourri
FamilySearch. . . . . . . . . . . . . . . . 1 Overview – Video
FamilySearch. . . . . . . . . . . . . . . . 2 Overview – Screen Shots
FamilySearch. . . . . . . . . . . . . . . . 3 Syncing AQ/PAF Data with Family Tree (Basics)
FamilySearch. . . . . . . . . . . . . . . . 4 Syncing AQ/PAF Data with FSFT (Advanced)
FamilySearch. . . . . . . . . . . . . . . . 5 Link and Sync Individuals
FamilySearch. . . . . . . . . . . . . . . . 6 Finding Duplicates in FamilySearch Family Tree
FamilySearch. . . . . . . . . . . . . . . . 7 Upload Data to Family Tree
FamilySearch. . . . . . . . . . . . . . . . 8 Advanced Handling of FamilySearch Sources
FamilySearch. . . . . . . . . . . . . . . . 9 Memories Manager
FamilySearch. . . . . . . . . . . . . . . . 10 Finding Names for Temple Submission
Classroom. . . . . . . . . . . . . . . . . . 1 Tips on Speeding Up Imports from Family Tree
Classroom. . . . . . . . . . . . . . . . . . 2 Syncing Notes between Your AQ/PAF file and Family Tree
Classroom. . . . . . . . . . . . . . . . . . 3 Syncing Sources between Your AQ/PAF file and Family Tree
Classroom. . . . . . . . . . . . . . . . . . 4 Importing Family Lines from Family Tree
Classroom. . . . . . . . . . . . . . . . . . 5 Handling Changing PIDs of FamilySearch
Classroom. . . . . . . . . . . . . . . . . . 6 Automatically Link All Records with FamilySearch
Classroom. . . . . . . . . . . . . . . . . . 7 Selecting Standardized Places for FSFT
ORTS . . . . . . . . . . . . . . . . . . . . . . 1 Full Training – Video
ORTS . . . . . . . . . . . . . . . . . . . . . . 1-1 Intro to the set of videos
ORTS . . . . . . . . . . . . . . . . . . . . . . 1-2 Overview of the Reserve/Create Batches Screen
ORTS . . . . . . . . . . . . . . . . . . . . . . 1-3 Identifying/Adding Potential Records
ORTS . . . . . . . . . . . . . . . . . . . . . . 1-4 Qualifying
ORTS . . . . . . . . . . . . . . . . . . . . . . 1-5 Manage Batches
ORTS . . . . . . . . . . . . . . . . . . . . . . 2 Overview Video
Classroom. . . . . . . . . . . . . . . . . . 1 Finding, Reserving and Tracking LDS Ordinances
Classroom. . . . . . . . . . . . . . . . . . 2 Using ORTS, Ordinance Reservation and Tracking System
Classroom. . . . . . . . . . . . . . . . . . 3 Handling LDS Ordinances
Classroom. . . . . . . . . . . . . . . . . . 4 Answering Questions before Reserving LDS Ordinances
Classroom. . . . . . . . . . . . . . . . . . 5 Get a List of Ancestors Who Turned 110 Years Last Year
Classroom. . . . . . . . . . . . . . . . . . 6 Potpourri
Ungrouped. . . . . . . . . . . . . . . . . 0 Convert to AQ from PAF
Index of Topics for This Class
That’s just under a hundred and thirty links to videos and instruction pages which can help you use Ancestral Quest more effectively.
In the list above, if the number to the left of the video link is highlighted, then that number is a link to the discussion of the video in AQWillDo.
The next AQWillDo post will have the links from the Ancestral Quest Virtual Booth at RootsTech Connect 2021. Following posts will examine some of these Learning Center and Virtual Booth videos. If you are not a Follower of AQWillDo find the box on the right which says ‘Follow AQWillDo’ and click on it. Follow the instructions, and you will receive posts of AQWillDo in your email.
FamilySearch has Duplicates?
There are approximately 8 billion records of individuals on the public FamilySearch Family Tree. (Hereinafter referred to as FS Tree) Some of them are duplicates. That is, records referring to the same person, but with slightly different information. Some duplicate records may even contain the same information.
How do the duplicates get there? It’s easy. Either one person enters a record for a given person two or more times without checking to see if the information is already there, or two or more people enter information on the same person without checking to see if the information is already there.
Is that a problem? They have enough storage space for 8 billion records, so it is reasonable to believe that they have planned ahead, and have more storage space available. If they run out of space, they can always buy more hardware.
So why is it important to find and remove duplicates? Let’s say that Jonathan V. Doe was born 3 May 1721 in the town of Fordwich, Kent, England, population 381. Lets also say that over time 416 people enter Jonathan into the FS Tree. Now lets say that 364 of those 416 people checked to see if Johathan’s information was already there. The first one found that there was no record for Johathan and the other 363 found that first record and either used it as it was, or added to the information known about Jonathan. They did not use, or merge, any other records for Jonathan.
That leaves 52 people who, at some time, each entered a new record for Jonathan V. Doe, born 3 May 1721 in the town of Fordwich, Kent, England, population 381. Some entered him as Jon V. Doe, some as John V. Doe, Some as Jonathen Doe, some as John Doe, some as John, some as Jon. Some entered the date as 8 Feb 1721, some as 3 Mar 1721, and some were sure that Fordwich was really in Shropshire.
Still, that is only 52 extra records in a database holding 8 billion. Why is that important? Here’s why. There are now 53 records for Jonathan. There are 53 opportunities for people to extend the line with both ancestors and descendants. There are up to 53 individuals or groups of people doing the same research, but for different versions of Jonathan. Those 53 groups could have been spending their time productively rathar than wasting their time doing research which would have been available to them if only they had known that it was already there. Jonathan is probably not the only person on the FS Tree with more than one record referring to him. Duplicate records invite duplicate (wasted) research and wasted space.
As we reduce the number of duplicate records by combining multiple versions of the same individual, we slow down the increase in the size of the FS Tree, and we increase the linage-linked aspect of the records. That allows us to take advantage of research done by other people by connecting our reseach to theirs.
Incline Software has a video where Gaylon Findlay describes how a person can create a database which he calls DuplicateFinder.aq. This file is used to help find duplicate FS Tree records cooresponding to the records on a local family file. I don’t know the name of your family, so I will refer to your family file as (Family).aq.
Before I show this video to you, let me emphasize that under NO circumstances should you actually use your (Family).aq file instead of the DuplicateFinder.aq file. All links to the records in FS Tree will be removed from the DuplicateFinder.aq file you are using. If you use your (Family).aq file instead of the DuplicateFinder.aq file you will destroy all of the links you had to the FS Tree. The only two ways to recover that information are by restoring a backup of the (Family).aq file or by re-linking records individually.
Here is how Gaylon created the DuplicateFinder.aq file.
In my posting ‘Find the Dead‘ I described my Centerville.aq file. This file is not the typical (Family).aq file because I have a very high percentage of living people there. It would be an unnecessary waste of time and internet traffic for me to ask AQ to send queries for all of those living people up to FamilySearch just to have them sent back down to me as living people, about whom they can supply no information. So I decided to take a different approach to creating my own DuplicateFinder.aq file.

Stats for the Centerville.aq file.
If you intend to follow along with this process using your (Family).aq file, do this NOW.
Open your (Family).aq file, and MAKE A BACKUP NOW.
Here is what to do after your backup.

From your (Family).aq file click on the ‘File’ tab and select ‘Save As…’ from the menu.

Name the new file. This is an intermediate file which will later be discarded, so name it appropriately. I chose the name ‘Intermediate’ because it is meaningful to me. Click the ‘Save’ button.
STOP
Close the (Family).aq file and open the intermediate file.

Click on the ‘Tools’ tab and select ‘Preferences’ from the menu.

Click on the ‘Database’ tab. Enter the name of your interim file in the ‘Title’ box. I do this so that the top line of the AQ screen will show the Title of the interim file, not the Title of the (Family).aq file. I like all the visual clues I can get.
Off the subject for just a moment, if you configure the name of your backup files as illustrated above, the backups will be grouped in the File Explorer window by (Family) name, and within that, they will be listed chronologically by the date and time of the backup. If you keep multiple copies of backups it’s nice to see them listed in order. The most recent backup of any file will be at the top or bottom of its (Family) group. Your choice.
Click the ‘OK’ button.

In the interim file click on the ‘FamilySearch’ tab and select ‘Unlink Individuals(s)…’ from the menu.

Check again by looking at the bottom right of your screen, and be sure that you are not in your (Family).aq file. You don’t want to make a mistake here. Click on the ‘All Individuals in File’ radio button, then click on the ‘Unlink’ button.

AQ warns you that you are about to remove all links to the FS Tree, and asks if you are sure. Click the ‘Yes’ button.

AQ confirms that the links in the records were removed, and tells you how many links there were. Click on the ‘OK’ button. Your interim file now has no links to the FS Tree.

Click on the ‘Search’ tab at the top of the screen and select ‘Advanced Filter/Focus…’ from the menu.

We are about to remove the records for all individuals whom Ancestral Quest does not recognize as ‘Deceased’ because we don’t want to try to process records which we know FamilySearch will not allow us to know about. Be certain that the ‘Selections by Relationship’ drop down box is set to ‘Individual’ then click on the ‘Define’ button.

Scroll down the ‘Possible Fields’ list and select ‘Deceased'(1) from the menu. Push(2) it into the ‘Current Filter’ and select the ‘Is not'(3) radio button. Click on ‘OK'(4) in the ‘Deceased Field Filter’ window.
Click on the ‘OR’ button, then continue.

In my file I have used the word ‘Dead’ in the ‘Death Date’ to indicate that I do not know whether the person is living or dead. If I know the person is not living, but I don’t know the ‘Death Date’ I enter ‘Deceased’ in that field. AQ accepts either value in the ‘Death Date’ field, and in response to either it places the gray FamilySearch icon on the Family and Pedigree views. For any person with ‘Dead’ in their Death Date, I can click on the icon and see if FS Tree believes they have died. Since almost all of these will be living, I don’t want those records in my interim file. I will add them to this ‘Current Filter’ to be removed with those who are not identified as Deceased by Ancestral Quest.
Scroll down the ‘Possible Fields’ list and select ‘Death Date'(1) from the menu. Push(2) it into the ‘Current Filter’ and select ‘Contains'(3) from the drop down box. Enter ‘Dead’ into the ‘Date’ box. (4) Click on the ‘OK'(5) button in the ‘Death Date Field Filter’ window.
Click on the ‘OR’ button, then continue.

Select ‘Name'(1) from the ‘Possible Fields’ menu. Push(2) it into the ‘Current Filter’ and select the ‘Surname Only'(3) radio button. Select ‘Does not exist'(4) from the drop down box. Click on the ‘OK'(5) button in the ‘Name Field Filter’ then click on the ‘OK'(6) button in the ‘Search for Individual/Marriage’ window, then continue.

Click on the ‘Show results only'(1) checkbox. Click on the ‘Delete'(2) button. The Yes/No(3) box will appear. Click on the ‘Yes'(4) button. Click on the ‘OK'(5) button in the ‘Search for Individual’ window.

That removed the living from the file, but that leaves us with gaps in the RIN numbers where records of the living were removed. It will be more convenient to have consecutive RIN numbers, so we must renumber the records.

Stats for the Intermediate.aq file.
I now have a DuplicateFinder.aq file with RINs ranging from 1 to 10955. This will allow me to more efficiently remove duplicates from FS Tree.
Since I have fewer than 11,000 records to work with in a file with 18964 RINs, I know I don’t want to do it all at once. I will break it into smaller groups of 50 records. I will also open a DupFindCount.txt file where I will record the starting and ending RINs for the next batch to put through the system. That way, I can stop at any time, including in the middle of a 50 record batch, and come back later to start over. If I didn’t complete the last batch I worked on, I will just run it through again.

Here is how I will get rid of RINs that are in my Deleted RIN List. This is a list of formerly used RINS of deleted records. The Rins are waiting to be reused. I don’t want any wasted space in my 50 record batches, so I will compact my IntermediateFinder.aq file into a DuplicateFinder.aq file with no unused RINs.
Click on the ‘Export’ icon at the top ledt of the screen. We need only vital statistics, so lets not export unneeded information. Uncheck all items in the ‘Include’ box, Click on the ‘All’ radio button, then click on the ‘Export’ button.

Click the ‘OK’ button.

Stats for DuplicateFinder.aq.
Here is a link to the full ‘Find Duplicate Records on FamilySearch‘ video, where you can learn how to make those removals for FS Tree records matching your ancestors.
Here is a link to the ‘Ancestral Quest Learning Center‘ webpage.
Roots Tech Connect 2021

It is finally here. Roots Tech Connect 2021. In the past there have been many reasons to not attend Roots Tech. Too far away, too expensive, too inconvenient, just to name a few. Who could take 1-3 days off work and travel to Salt Lake City, Utah?
Now the excuses are gone! It isn’t too far away, it’s on your Desktop, Laptop, Tablet, or Phone. It isn’t too expensive, it’s FREE. It isn’t inconvenient. Even though the event is listed as being held 25 Feb 2021 – 27 Feb 2021, the presentations will all be available at least until Roots Tech 2022 begins.
https://www.familysearch.org/rootstech/rtc2021 is the URL to get you there, or click the link above.
ADDENDUM
Well, RootsTech is over, but the links to the venders are still available. I haven’t heard an actual final date, but as I said, I have heard some say that it should be available until RootsTech2022 takes its place. The link above is still active, and it points to the URL listed above.
If you go to the Expo Hall and scroll down, you will see that Ancestral Quest is one of the Bronze Sponsors. If you click that icon it will take you to the Ancestral Quest Virtual Booth. When you are there, click on the Connect button on the lower right corner. That’s where you can join a chat room of people interested in AQ. If you instead click on Direct Messages and scroll down from there, you will see a list of people registered for RootsTech who are related to you. You can click on them and chat with them. They will see your message when they next login to RootsTech.
If you continue to scroll down you will see an invitation to view the ‘Map of My Relatives.’ Here you will see how many of those who registered for RootsTech are related to you. You will also see some of them listed along the left side of the screen. Click on one and you will see that you can Send a Message, View Relationship or Add Friend. View Relationship shows the relative you clicked, then it travels up that ancestry as many as 12 generations, looking for a relative common to both of you. When found, it travels down the other leg of the ladder to show you at the bottom. You can send messages to relatives you may not know, and start a new friendship. You can add relatives to a Friend List. I tried it, but I don’t know yet how to find my Friends List. Let me know if you have had better luck.
One caveat. To use all of the features you must have an account at FamilySearch, and you must be logged on to FamilySearch and RootsTech to get all features to work.
Use the User’s Guide
Incline Software produces a book called Ancestral Quest User’s Guide. It is available in the United States as a paperback, and around the world as a PDF file. It has 545 pages. I use it when I need to understand how to do some of the less common things that AQ Will Do.
If you would like to own this manual, you can get it from this website:
https://www.ancquest.com/orderonline.htm#AQ16BM (This is a link)
When the screen appears, scroll down to the section labeled Training Aids for Ancestral Quest.
My computer isn’t close to my book cases, so I buy this book in PDF format. I keep it and its predecessors in the C:/Data/AQ/Manual/ path.
My memory isn’t what it was when I was younger, and I don’t like searching around to find where my manual is, so I let AQ go get it for me.
My last post described how to get AQ to search with Google for obituaries. AQ passes a string to your browser, and the browser executes the string. Typically we think of the browser as a way to access the internet, but that isn’t all it can do. It can also access files on the computer’s file system.
You have probably seen references to websites which begin with the characters https://. The https stands for HyperText Transfer Protocol Secure. Browsers can also execute strings beginning with file://. One such statement might be:
file://C:/Data/AQ/Manual/AQ16_UsersGuide.pdf
This is the string we will use to access the Ancestral Quest User’s Guide. The process is just like the process we used to access the Google website, but this time we will go, not to the internet, but to the hard drive, or some other device known to the file system.
To begin, click on the Internet tab at the top of your AQ screen, then select the Favorite Sites menu item. When the My Favorite Web Sites screen appears, click on the Add button. The Add/Edit Favorite Site screen appears.
Fill in the Title and URL boxes. Note that the Search this site** checkbox is not checked, so AQ will pass this string directly to the browser.
You will probably need to change the string in the URL box because the path to the folder where you store your User’s Guide will not be the same as mine. Store the guide wherever you want, but put the path to the file between the file:// and the AQ16_UsersGuide.pdf.
When the User’s Guide opens, you can use the <CTRL>F keys to find any topic contained in the book. The ^ and ˅ characters will allow you to skip through the text to prior or next occurance of the desired word(s).
When AQ comes out with a new major version and a new User’s Guide, you can buy the guide, and store it in the same folder with the older version, then click the Internet tab and select the Favorite Sites menu item. There you can click the modify button and update the name of the file.


