Find the Dead
Years ago a gentleman moved to Centerville and was later called as the Bishop of the Centerville 1st Ward. Mom and Dad were visiting with him one evening, and Mom advised him that he should never say anything negative about anyone from Centerville to anyone else from Centerville because they were probably related. She was only half joking.
When Mom told me about that, I suggested that we start an AQ file of the people we know in Centerville, then trace their ancestry to see if we find any surprises. This was the origin of my Centerville.aq file. The resualt is that I have a file with very many people who all lived at one time in one general locality.
The file grew as I added the entire 1964 graduating class of my high school, and again as I added the names of all of the students in Centerville Elementary School class photos for myself and my siblings.
I have also found elementary school class photos for three of my uncles, my father and my mother, and I am adding the names of the students whom I recognize from those photos.
Eventually I will add those photos to the Memories section in FamilySearch.org for ONE identified deceased individual in each photo, and tag the other known deceased individuals as I find them. Suddenly families will discover school class photos of a recently deceased family member showing up in Memories. This may inspire them to tag other deceased class members whom they recognize. This could create the genealogical equivelant of “going viral.”
One problem with this scenario is finding which students are deceased. The first obvious answer is obituaries, but I want a quick and easy way to find those obituaries.
Back in 2013 I posted an article on AQWillDo about how to get to AQWillDo from inside AQ. The title is AQWillDo in AQ. It shows how you can use the Internet tab at the top of your AQ screen to access the AQWillDo blog. Here is the pull down menu I see when I click on Internet->Favorite Sites, and scroll down to the bottom of the menu:

If I highlight the AQ Will Do item in the menu then click the Connect button, AQ will instruct my browser to open the AQ Will Do blog. The next two items on the menu will search FindAGrave for the currently highlighted individual. It is the bottom two menu items I want to discuss here.
One of the quickest ways to find an obituary if you don’t know where it is located is to search for it with Google. For example, if I wanted to find the obituary for my father I would go to Google.com in my browser and enter: obituary Clyde McIntyre Utah. In this case I add Utah to the end of the search because my father died here in Utah. If I am unsure of the place of death, I enter: obituary Clyde McIntyre.
When I enter a search in Google, it converts that request to a search string. Here is the string which is produced when I search: obituary Clyde McIntyre.

When I search for: obituary Clyde McIntyre Utah, the search string produced is:

The first search is looking for three terms: obituary, Clyde and McIntyre. The rest of the search was created by Google, and I don’t know what all of it does, so I will not change it. The second search adds the term Utah to the search. If there is a high probibility that the death was in Utah, I would use the second search. If that fails or if I had no reason to suppose the death was in Utah, I would use the first search.
To tell AQ how to do a Google search I would start by copying that search string from the URL box in my browser. Then I would go to AQ and click the Internet tab and select the Favorite Sites menu item. This screen appears:

I am going to add an item to the My Favorite Web Sites menu, so I click on the Add button. This screen appears:
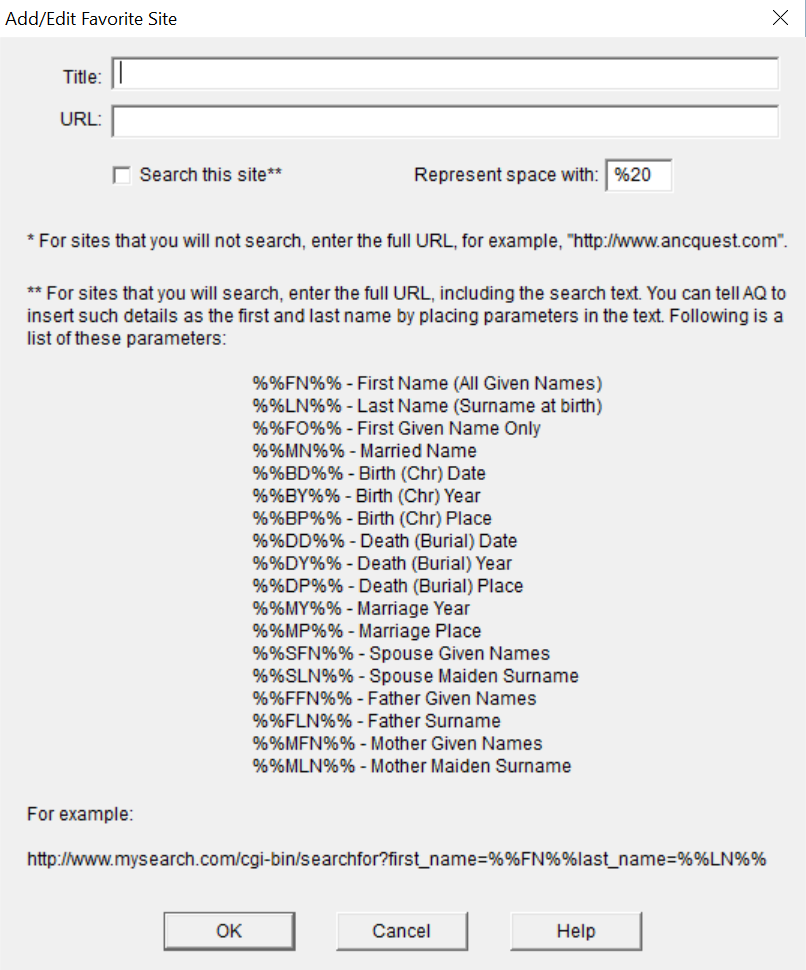
It looks like there is plenty of space to enter a Title, but look at the My Favorite Web Sites screen above and see the result of long names on the menu, and plan accordingly.
The URL box will contain the information AQ will pass to your browser. This information falls into two categories. The first is a Page URL. AQ will pass it directly to your browser. The second is a Search URL. AQ will attempt to place information from your currently selected AQ record into the URL before passing it on to the browser. To do this, AQ will scan the URL looking for codes preceded by %% and followed by %%. When AQ finds one of these codes, it will replace the code and the surrounding %%s with the requested information from your record. While it is possible to place a Death (Burial) Place into the URL, there is no way to use only the State name, so the name of the state, if used, must be hard coded into the URL. The same is true of the word obituary. It must be hard coded because it is not a part of your AQ file. These values are placed into the search string when you first go to your browser and perform a search so that Google will provide you with the correct search string.

In the example above where I searched Google for: obituary Clyde McIntyre, I copied the URL (search string) from that Google search and pasted it into the URL field on the Add/Edit Favorite Site screen. I clicked once on the URL and used the right arrow key to move to the location of the two values which could be found in my record in the AQ file. I replaced the word Clyde with the code %%FN%% (meaning First Name) and I replaced the word McIntyre with the code %%LN%% (meaning Last Name). I clicked the Search this site** box so that AQ would know that it needed to replace these codes with the first name and the Last name, respectively, from the currently selected record in my .aq file.
Note that in some cases, Google places search terms in more than one place in the search string. Be sure that you convert each search term in the search string the code representing it.
Now I can select a person in my file for whom there is no death information, click on the Internet tab, select the Favorite Sites menu item, scroll down and click on the Google Obit (Giv+Sur) item then click the Connect button.
My browser will fill the screen and present the result of my Google search. Here are the first five items returned on that search requested from within AQ:

Here are the first five items returned with the search from inside AQ with Utah hard coded in the URL:

If this is unclear, please leave a comment.
Protect the Living
Get rid of all those pesky living people!
What is CSV?

OK, so What is CSV?
CSV is an acronym for Comma Separated Values. They don’t look very good as a report, but your spreadsheet will love them.
The idea for this lesson came from a comment I received today on AQWillDo. The comment asked how to create a CSV file because CSV doesn’t appear anywhere on the Reports and Charts screen. There are a few ways to get AQ to create a CSV. The most obscure way I found was as the output from a database compare. I’ll let you figure that one out on your own. (Hint: Look up CSV in the AQ 15 User Manual) The easier way, and probably the way you are most likely to use is to create a Comma Separated Values file from a Custom Report.
Here is part of a CSV file I created to experiment with how it all works. I learned a few things while I did that experiment, and you may as well see what I learned.

Above is a CSV report of some of the people in my file who were born in 1845. To get this report I started a Custom Report where I selected the RIN and Surname, Given Names as the two fields to place on the report. I sorted the report in ascending order by RIN. I clicked the Select button then the Define button to tell AQ which records I wanted in the report. I selected those born in the Range 1 Jan 1845 to 31 Dec 1845. When I returned to the Reports and Charts screen I clicked on the Text File (.txt) radio button. That is what created my output in the CSV file format. Note that AQ appends the .txt file name extension, and not .csv. That will not stop your spreadsheet from reading the file.

Above is the same report when the destination is Printer/Screen. The major differences are that the CSV version shows each field in quotes, and a comma separates the two fields on each line. Notice also that in the CSV version the names Brown through Marsden do not line up with Harrison through Kirkham. This is because some of the RIN numbers are three characters long and others are four characters long. This shift doesn’t happen in the Printer/Screen version because you format the spacing as you select the fields, if not actively, then by default.
You may be asking why the comma between the surname and the given names doesn’t cause the CSV file to have three fields instead of just two. That is what the quotes around each field prevent.
Suggestions/Questions about AQ Will Do or Subjects discussed here? Click the Comment tab. I would like to hear from you!
Custom Event Sentences

In his album, The Button-Down Mind Strikes Back!, Bob Newhart quoted a monkey which typed, “To be or not to be: that is the gazornenplat.”
Sometimes there are sentences that just don’t conform to the expected. For example, we can look at the expected form of the sentence created to describe the Cemetery User Event. This event uses one date, one place, and two descriptions. The first description holds the name of the cemetery, and the second holds the plot location. The main purpose of the Cemetery User Event is to identify the cemetery where the body is interred, so the first description field is not optional. All other fields are. Here is a possible set of sentence building codes for such an event:
![]()
If FindAGrave.com shows us that Joseph died on the 12th of November in West Jordan, Salt Lake, Utah, United States and was buried in the Redwood Memorial Cemetery, but we don’t know the actual date of the burial nor the plot within the cemetery, we could enter the following values in the Cemetery event fields, and let it produce the Sample Sentence shown.

The sentence is formed as we expected, but what happens if FindAGrave tells us that Joseph was cremated?

“…at the Cremated in West Jordan…” just isn’t how we want to say it.

Here is a solution to our problem, but first, let’s do some ground work. Cremation isn’t the only thing which could change the needs of our Cemetery event sentence. Joseph could have been buried in an unknown grave or lost at sea. As we encounter circumstances which dictate that we change the form of our sentence, we will want to keep a record of both the original sentence codes and the new custom codes we create to meet those circumstances. I created a folder which I named \EventSentences. I keep this folder inside the folder where I store all of my AQ Data. Understandably, I call this folder \AQ_Data. Inside the \EventSentences folder, I store a file for each User Event for which I need sentence codes beyond the standard codes for that event type. Within that file, I store the codes for each of the custom sentences I identify. I also store the standard codes for that event type, just in case I do something wrong and need a way to get back to the original. Here is what I placed into the C:\AQ_Data\EventSentences\Cemetery.txt file:

I can copy these sets of codes and paste them into the Cemetery User Event as needed. I can also create new codes as I identify the need to do so.
Now let’s go back and see how we actually use those custom codes. We will start by entering a second Cemetery event. That way the original Cemetery event remains untouched.

We edit Joseph’s Individual record, click the Add button for Other Events, and select the Cemetery event from the list.

I will use different date and place information to make it easy to remove this example when I am finished. When we click on the Use Custom Sentence checkbox, the Edit Sentence button becomes active. We will click on that button.

On the screen which appears we will edit the sentence code for this occurrence of the Cemetery event for this individual only. It will not alter the codes for the standard Cemetery event.

We will copy this code…

…and use it to replace the original code. We now can use the Cemetery event to show non-standard burials.
Suggestions/Questions about AQ Will Do or Subjects discussed here? Click the Comment tab. I would like to hear from you!
Sex Change

Sex Change in AQ?
I received an interesting Comment to the article Legal Name Change.
Comment:
Thanks for this great article. A related issue I’ve been trying to figure out relates to when someone not only changes their name, but also their sex. Is there *any* way to handle this in AQ. (I haven’t found a way.)Response:
The answer to your question is both simple and complex. From a software point of view, changing the gender of an individual is as simple as editing the record and clicking a different radio button. If the record is linked to a marriage record as the husband or as the wife, the gender radio buttons are grayed out, and you can not make the change. If the individual is not linked to a marriage record as the husband or the wife the radio buttons are active, and the change can be made. That’s the simple answer. The more complex answer is needed if there was a marriage and a subsequent sex change. I am not aware of any genealogical standards which define how that situation should be handled, so we seem to be breaking new ground. Here is one possible solution. In the record which shows the birth gender, show the Legal Name Change. Create a record (a new individual) with the new gender and the new name, and show the same Legal Name Change. Now marry the two records so that they will always be linked together. Create an Other Event called Sex Change where you show a date, a place, and the beginning and ending genders. Add this Other Event to both records. I know that no genealogical purists would accept this, but I also know that AQ will not handle a sex change for a married person, so “Ve duz vat ve kan duz.”
For this lesson, we will create a new AQ file and start with only one individual.

Victor is a male.

We will add the Other Event called Legal Name Change.

We will add the new name, and let the old name be entered by default.

We need to create the Other Event called Sex Change.
When I went back and looked at the Legal Name Change article, I saw that my blogging software, WordPress, removes what it thinks is invalid HTML code, so the Sentence Usage codes were wrong. I was trying to make them cut and paste-able, but WordPress will not let me do that. Fortunately, the codes for the Sex Change sentence fit on one line, so there is no question about whether there is a space between the first line and the second line.

We add the Sex Change to Victor’s record.

The date we entered places this Other Event into the right chronological order.

Now we will create the female version, Victoria.

Both records now exist.

We now add the Sex Change to Victoria.

Be sure that the information here is the same as what you entered for Victor.

Now we add the Legal Name Change.

This needs to be the same as the one we did for Victor. Notice that since this is Victoria’s record, we can not leave the second Description blank, and let AQ provide the default name.

Now they both show the important info.

Now we marry Victor/Victoria. Since Victor is already in our file, we search for his record instead of creating him again.

We know that his RIN is 1.

The date and place for the ‘marriage’ will be the same as for the Sex Change. I chose to select Not Married and No Children. I will also add a marriage note.

This makes it clear that there is no real marriage. It also explains that we are using a marriage record to keep the records for Victor and Victoria easily accessible.

Here is the Family view…

and this is the Family Group Record.
Suggestions/Questions about AQ Will Do or Subjects discussed here? Click the Comment tab. I would like to hear from you!
Legal Name Change

I am a member of the Yahoo Group AQ_NFS. This is a forum for people who take advantage of the links available within Ancestral Quest to the FamilySearch Family Tree. A group member posed an interesting question:
I have a niece with the Given Name of Ruth Smith, she married and then went by Ruth Jones, she then divorced and legally changed her name to Ruth Johnson. My question, from a genealogy standpoint, is she known as Ruth Smith, Ruth Jones, or Ruth Johnson?
Along with others, I gave my opinion, then I changed my mind. I decided to focus on the side issue rather than the actual question. That side issue is: How do I handle a Legal Name Change? By this, I am not referring to the name change which usually takes place because of a marriage. I am thinking specifically about the kind where you go to the court and petition for a legal change of your name.
My concern is that there should be a way in AQ to show an audit trail of the name changes. It is possible to have more than one legal name change. I decided against using Notes because I usually look at notes as an afterthought. I suspect that there are many people who fill in the blanks of the Edit Individual screen but don’t get around to looking at the notes for everyone they import. I decided to create a Legal Name Change event.
Like many of you, I begin tracking an individual by their Birth Name. My Grandfather’s name according to the records was George Albert Beattie McIntyre.

His mother’s maiden name was Crombie, and shortly after his birth, she changed his name to George Albert Beattie Crombie McIntyre. I don’t know if she went through a legal process. Let’s pretend that she did. I want an Other Event for my grandfather which shows where and when his name was changed, and what the changes were.

On the Edit Individual screen, I click on the Add button to add the event. I scroll down the list of possible events and find that there is no event for a Legal Name Change. To create it, I click on the Add Type button.

I give my event a Title, a Short Title, and an Abbreviation. I specify that I want to use a Single Date, One Place, and Two Descriptions. I want the first Description to show the new Legal Name, and I want the second Description to show the prior name. I click the Add button to add this event to the list of possible events.

Oops! AQ will not let me create a new event without giving it the codes it needs in order to know how to form a sentence describing the event. If you would like to add a Legal Name Change event to your file, feel free to copy the code below, and paste it into the large box in the Sentence Usage section. Here is the code I will use:
‘%3 legally changed %{his;her;the} name%%%%[%0; from %0; from %1].’ (WAIT, not yet)
Copy everything from the first percent sign to the final period. Do not copy the first and last single quote. After you paste it, the Sentence box should look like this:

The Sample sentence shows what will be generated if the Gender, Date, Place and the first Description are filled in. The fields are considered populated if the corresponding radio button or checkbox is checked or clicked. Let’s break down the sentence building code and learn how it works. Let’s start at the very beginning. Our first code is:
‘%3’
If we put only %3 into the sentence box, the output is:

The %3 code places either the word He or She‘ into the sentence, depending upon the gender of this individual. If the gender is Unknown, the %3 code will cause AQ to select the first given name of the individual. In the Sample sentence, the default first given name is always Lynn. If my grandfather’s gender were specified as Unknown, the %3 would place George into the sentence.
Next, we will include some text in the sentence. I will place it in single quotes so that the spaces before and after the text are visible.
‘ legally changed ‘
Now we will insert the next code
‘%{Male;Female;Unknown}’
In this code, replace the word Male with the word/words you want to see if the individual is a male. In our case we will use ‘his‘ as the word. For Female ‘her‘ will be our word. For Unknown, ‘the‘ will be the word. What we will actually enter is:
‘%{his;her;the}’

We have switched from a male to a female, so AQ has changed He to She and is using her as the last word. Now I will show the next section of the code. Pay attention to the space. The single quotes make the space visible.
‘ name’
Here ‘ name’ is text to be inserted into the sentence. It is followed by this code:
‘%<5’

The code %5 represents Date 1. When there is a < sign between the % and the 5, AQ knows that we are asking whether this individual has a Date 1 value in the Legal Name Change event record. If it does not, it looks ahead and discards everything up to the next > sign. If there is a value in the Date 1 field, AQ follows the instructions immediately after the 5. Those instructions look like this:
‘ ‘
It is a space character, so AQ copies the space into the sentence. Next, AQ finds:
‘%@’

The %@ tells AQ to examine Date 1 and see if it contains before, after, or about. If it does, it will be inserted into the sentence. AQ checks Date 1 to see if it is a complete date or a partial date. If it is complete AQ inserts ‘on’ into the sentence. If it is a partial date, AQ inserts ‘in’ into the sentence. AQ now finds a space and inserts the space into the sentence. Next, AQ finds the code %5 and inserts the date into the sentence. If the Date 1 field was blank, nothing is inserted relating to the date. Note that the gender is now Unknown, so the first word in the sentence is Lynn instead of He or She.

The next set of codes is:
‘%<6 at %6>’
%6 is the code for Place 1. AQ checks to see if there is anything in the Place 1 field. If there is, it first copies ‘ at ‘ into the sentence, then copies the place into the sentence. Note that we indicated that there is no value in the Date 1 field, and the gender is now Male, so the sentence changes as needed.

The next set of codes is:
‘%<7 to %7>’
%7 is the code for Description 1. AQ checks to see if there is a value in the Description 1 field. If there is, AQ copies ‘ to ‘ into the sentence, then copies the content of the Description 1 field to the sentence.

The next set of codes is:
‘%[%0; from %0; from %1].‘ I’m changing this one to
‘ from %[%0;%0;%1].’
There are two different flavors of Legal Name Change. The first is the type where you change a name from either its Birth Name value or its Married Name value to a Legal Name Change value. Statistically, this is more likely to happen than the type where the name is changed from the current Legal Name Change value to a different Legal Name Change value. Everyone who has changed a name legally has gone through the first process. Only those who have legally changed names more than once go through the second type. Since the first type happens for everyone who makes a legal name change, I made it easier by not requiring the second Description field to be entered.
The code above is called an If Then Else. The If comes before the first semicolon. The condition we are using is %0. It means, “If there is a value in the second Description field…. The value before the second semicolon is the Then part. This is what AQ will do if the condition %0 is true. If there is a value in the Description 2 field it will be copied into the sentence. The part after the second semicolon is called the Else. That is what happens if the condition %0 is false. If there is no value in the Second Description, the full name of the Individual is copied to the sentence. The last thing that happens is that the period is copied to the sentence.
Here is an example of how the whole thing works.
My grandfather’s Birth Name was George Albert Beattie McIntyre. His mom changed it to George Albert Beattie Crombie McIntyre.

On the Edit Individual screen click the Add button to add the first Legal Name Change event. Scroll down to Legal Name Change and highlight it. Click the Select button.

Fill in the date, place and new legal name. Watch the Sample Sentence as it forms. This sentence will go into your documentation.

This begins our audit trail.
When Grandpa went to school, the teacher called roll and referred to him as George ABC McIntyre. The other students began calling him Alphabet. He went home and announced to his mother, “I am no longer a Crombie!”

The second legal name change requires that we place the prior Legal Name in Description 2.

Here is our audit trail.
As he grew older, he always referred to himself as George AB McIntyre. He didn’t actually change his name, but here is how it would have looked if he had.

Notice that his second Legal Name was the same as his Birth Name, so it wasn’t necessary to enter the second Description.

And the audit trail is there.
If you actually change the name on the Edit Individual screen after each legal name change, it is never necessary to enter the second Description.
OK, my years as a programmer are catching up with me. I can’t resist making just one more tweak. It will not change the output of the event but it makes the code shorter. Here is the code that you should actually put into the Sentence box:
‘%3 legally changed %{his;her;the} name%%% from %[%0;%0;%1].‘
I read this after it was posted and I discovered that WordPress, my blogging software, looked at the code in the red area above, and decided that I was entering badly formatted HTML code. It removed what it didn’t like, so what you see is not what I wrote. I’m sorry that this can’t be cut and pasted, but this is what I wrote:
![]()
This is the code you should use if you plan to make your own Legal Name Change event.
Suggestions/Questions about AQ Will Do or Subjects discussed here? Click the Comment tab. I would like to hear from you!
Let’s Get Personal

At work one day back in 1981 I received a phone call from Russ Borneman, who worked in the Human Resources Department of The Church of Jesus Christ of Latter-Day Saints. He asked me if I would consider accepting employment with the Church. After some consideration, I accepted that offer. He asked me how soon I could begin working for them, and I told him I would need a month to finish the project I was working on at Utah State University.
At the end of that month, I showed up at the Church Office Building. It was then I learned that the project manager for whom I was going to work was no longer employed by the Church, and the project which I had been hired to work on was no longer a project. I spent lots of time reading manuals, and wondering if I had made a major mistake in my life. One morning my new manager (Lynn Warr?) came to my office and asked me to attend a meeting with 4 other programmers. When I got to the meeting, three of the programmers were already there. The last to arrive was Robert Foster. Bob was the lead programmer on the soon to begin Personal Ancestral File project. His first question was, “Brethren, how are we going to implement lineage-linking on a home computer?” My first question, which I was too embarrassed to ask, was “What is lineage-linking?”

I was on the PAF team for only a short time while they were finding a project they really wanted me to work on. After I left the PAF project, I followed their project from a distance. When they were near production, they asked for volunteers to test the product. They wanted Personal Ancestral File to run on many different types of home computers, so they were looking for as many different types of computers as they could get in the test. By then I had purchased a Franklin Ace 1000 computer. It was a clone of the Apple II computer. It had two floppy disk drives, and I bought a video card which allowed me to convert from the standard Apple 40 column screen to the 80 column screen which was necessary to run PAF.
On my Franklin I could print the information from a particular address in the ROM chip, and it contained a copyright notice from Apple Computer Company. The Franklin was a better computer than the Apple II, In My Humble Opinion, but since Franklin stole the ROM from Apple, they eventually went out of business after the lawsuit.
When I finished my testing of PAF, I wrote a report on what worked or did not work to my satisfaction, and a list of things I would like to see before PAF went into production.
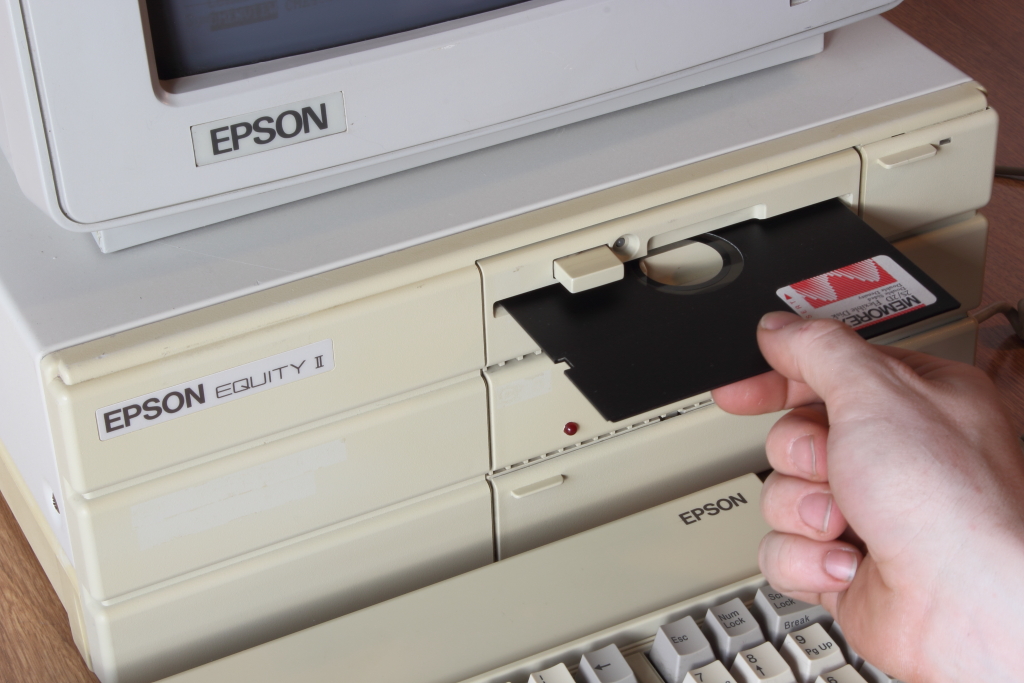
I think the beta test convinced the Church that they couldn’t support all of the different types of computers on the market, meaning the different operating systems. The final product worked only on PC-DOS and MS-DOS operating systems, meaning the IBM PC and IBM clones. At the Church, we had some of the old IBM portable (luggable) PCs available, and I hauled one from and to work several times while I played with the program. I eventually bought an Epson Equity II computer, with the optional, and at that time massive, 40 Megabyte hard disk. I was in Heaven.
I kept a spreadsheet with a list of the features I wanted to see in PAF, and periodically I would submit it to the PAF team. When I left Church employment in 1992, PAF included 17 of my suggestions.
In February of 2010 I started volunteering at the Ogden FamilySearch Library. I noticed an icon on the computer screen which I didn’t recognize. I clicked on it, and it started the Ancestral Quest program. It looked and felt familiar, even though I had never seen Ancestral Quest before. I asked whether the FamilySearch Library had a class on Ancestral Quest, and they told me that they had a teacher, but he was unlikely to return because of health issues.
I had few options available. I asked if I could teach the class. That was my way of learning AQ.
Some History
The time came when the Church decided it was necessary to switch PAF from a DOS based program to a Windows based program, to keep up with the operating system which they believed would eventually overshadow PCDOS/MSDOS. PAF 3.0 could run on Windows, but it was totally designed for PCDOS/MSDOS. My opinion is that the Church had 4 options available to them at that point.
- They could train their DOS programmers to write Windows code.
- They could hire Windows programmers to replace their DOS programmers.
- They could hire Windows programmers to work with their DOS programmers.
- They could find a Windows program which already worked with Church specific information.
They chose the 4th option. They found Gaylon Findlay and Ancestral Quest. Gaylon allowed them to alter the source code for Ancestral Quest, and release it as PAF version 4.0 for Windows. That’s why AQ looked and felt so familiar.
After I had been teaching Ancestral Quest for some time I had former students asking how to do particular things in AQ which I had not covered in the class. When I answered their questions I wished that I had a way to let other former students know what questions were being asked, and what the answers were. That was the reason I started AQ Will Do. It teaches the things AQ Will Do, and how to do them.
I taught the AQ class for 6 years. I no longer teach the class, but I still post on AQ Will Do occasionally. If there are topics you would like to see discussed, please leave a Comment or email me at dcmc1945@gmail.com.
Updated: 2023-11-20
Is My File Healthy
 Obituaries are an inevitable part of being a genealogist. I have bookmarked three local newspaper obituary columns on the internet just so I don’t miss anything important to me. From time to time I see references to a death after the discovery of a disease in its later stages. These are deaths that might have been postponed. Regular medical checkups can lead to a longer and more fulfilling life.
So why discuss medical checkups on a website dedicated to Ancestral Quest? I thought you would never ask. (Maybe you didn’t, but here is the answer anyway.) Sometimes AQ files develop problems. You may not be aware of the problem yet, but AQ may need a checkup. It is a good idea to do this checkup on a regular basis, say once a month.

Click on the Tools tab and select Database Check/Repair.

From the menu select the Check Only radio button then click the Check button.

AQ is asking you to name the file which will contain the results of the search for database errors.

I append the -year-month-day-FileName-Version to the name of the file just before the .rpt. Click the Save button and the Check process will begin.

Check goes through all the parts of the file and looks for problems.

The report on what AQ found will appear. Scroll to the bottom of the report for a summary of what was found. If no errors were found, you will not see this file, and you have completed the task.
If there were errors click on Tools -> Database Check/Repair…

…but this time click the Check and Repair radio button, then click on the Check Button.

Now click on the Backup button.

AQ will ask you to confirm the name of the backup file it is about to create and to also confirm the location where you want the backup file.

I add -B4 just before the .aqz in the file name so that it will be easy to see the backup that was made just before a possible major change to the file. Click the Backup button.

The backup is complete…

…so click on the Check Repair button.

Create another checkfix file with the version number incremented by one from the last version number. In this case the version is 2.

When Check/Repair completes it will present the result file. Scroll to the bottom to see the Summary. This usually is sufficient to remove all errors from the file. However, sometimes one problem can hide a different problem, so I always re-run the Check/Repair function until I see this:

Don’t put yourself in a position where you need to write an obituary for your AQ file.
FamilySearch
I am a member of the Yahoo Group AQ_AncestralQuest. One of the group members made this request:
Please provide steps to include family search ID number in AQ14
He then described the field at the bottom of the Edit Individual screen by saying:
FamilySearch ID (greyed out)
I would have waited to see what replies he received, but I started thinking about two words he used: greyed out.
That meant that the FamilySearch ID was not available to be updated. The solution is simple, but only if you know the solution. This will demonstrate the problem:

The image above is similar to what he would see if he opened a file in Ancestral Quest.

This is what he would need to see in order to link his records to the corresponding records in the FamilySearch Family Tree. Here are the steps to get from the first version to the second version. First click on Tools -> Preferences.

The Preferences screen has several tabs. Click on the FamilySearch tab.

There must be a check in the checkbox labeled Enable FamilySearch features.

You will be notified that your selection will not take effect until you stop and re-start Ancestral Quest.
If you would like to join the AncestralQuest group, do this:

In Ancestral Quest, click on the Internet tab and select Ancestral Quest Home Page.

There, click on the Support tab, and select Newsgroup.

When you get there, type Ancestral Quest in the search field, and click the Search Groups button.

Scroll up and down the groups returned, and select the group or groups which interest you.
Suggestions/Questions about AQ Will Do or Subjects discussed here? Leave a Comment by clicking the Comment tab at the top of each article. I would like to hear from you!
API
API
Ancestral Quest has the ability to pass information to and from the FamilySearch Family Tree. To do this, two things are necessary.
- The user must have established a usercode and password authorizing access to the Family Tree.
- The program used (in this case Ancestral Quest) must access the FamilySearch Family Tree through the Application Program Interface (API) established by FamilySearch.
If you have attended my Ancestral Quest class, you may remember that I recommend that users change the value in the Tools -> Preferences -> Miscellaneous page, which controls how often the program checks with Incline Software to determine whether the current version of AQ is being used. The default value is 30 days.
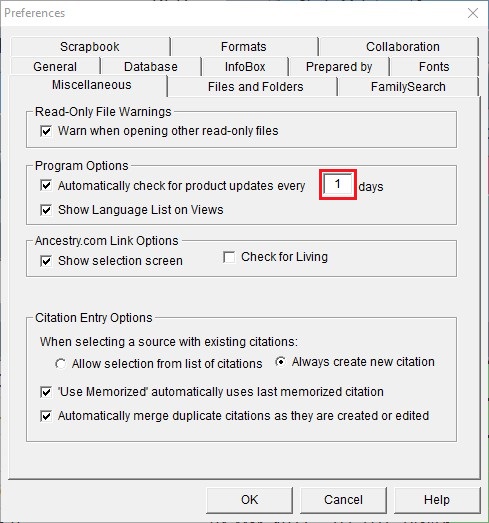
I recommend the value 1. This causes Ancestral Quest, when the program opens, to first check to see if this is the first time the program has been started this day. If it is the first time, AQ will poll the server at Incline Software, and determine whether this is the most recent version. If it is the most recent, the Newsline screen will show that the current version is running.

If there is a new version available, the word CURRENT shown on a green background above, will be on a red background, and will say UPDATE. When this happens, choose one of the options available to the right on this line, download and install the new version.
There are two reasons for new versions of AQ.
- Improvements to the Ancestral Quest program.
- Changes in the Family Tree, which require changes to Ancestral Quest.
One of the changes to the Family Tree which would require a change to AQ is a change in the Application Program Interface. If the API changes, the old versions of “third party” software, will not know how to take advantage of all the information being made available by FamilySearch. Such a change could also cause old versions to run improperly. When the API changes, you need to know NOW.
On Monday, 27 June, 2016, at approximately 12:01 A.M., Mountain Daylight Time, the FamilySearch Family Tree is scheduled to go offline. FamilySearch is making some changes to the underlying structure of the Family Tree. These changes will necessitate a change to the API.
I have heard two versions of when the Family Tree will be available after the changes.
- As soon as the changes have been made.
- On Tuesday, 28 June, 2016, at approximately 12:01 A.M., Mountain Daylight Time.
When you download changes from the Family Tree to your local file, you download at least one piece of information which you don’t see on the Ancestral Quest screens. Each Family Tree record has a version number associated with it. This information is changed whenever there is a change to the Family Tree record. When you download information from the Family Tree, Ancestral Quest saves the version information so that on any future access of that record on the Family Tree, they have a quick and accurate way of knowing whether there have been any changes to the Family Tree record since you last downloaded information from it. Something about that version information is being changed in this upgrade to the Family Tree.
Because of this change, AQ users who access the FamilySearch Family Tree, will see a change on the first time that they click the Check for Changes… menu item on the FamilySearch tab menu.

All records in your local file which are linked to the Family Tree will show a changed version number on the Family Tree, so that routine will report that the record has been changed.

Run this routine against your entire file, and Mark All records as reviewed. Thereafter this process will run as it has in the past.
Suggestions/Questions about AQ Will Do or Subjects discussed here? Click the Comment tab. I would like to hear from you!


