GEDCOM 2
Using GEDCOM in Ancestral Quest – Export
Lets define our terms again. GEDCOM is GEnealogical Data COMmunication. It is a standard used to allow genealogical data to be moved between programs using different file formats.
Since the data can move in two directions, there are two ways to look at GEDCOM: Import and Export. That’s why there are two icons for GEDCOM on the tool bar.
![]()
The icon with the green arrow pointing into the storage device is the Import icon. The yellow outward pointing arrow is for Export.
Lets continue with Export. Click on the Export icon.

This is the Export GEDCOM File screen. It is divided into three areas: Export Type, Include and Selected Individuals. The Export Type area has three drop down windows for entry of data. The top one is Export for import into:. Click on this drop down window.
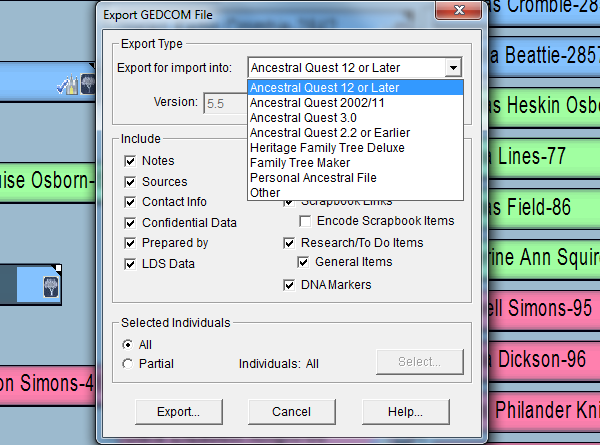
Here is where you tell Ancestral Quest about the type of system that will be receiving your GEDCOM. The first seven software products on this list are either products of Incline Software, or they are produced from code originally licensed from Incline Software.
The other two windows are labeled Version: and Char Set:. The drop down window labeled Version: shows two values, 4.0 and 5.5. The official standard version of GEDCOM as of this writing is 5.5, but that is a little deceiving. The de facto standard is 5.5.1, because it allows the use of the UTF-8 character set. GEDCOM 5.5 allows Unicode, but not UTF-8. These two character sets allow for more characters than can be defined by the 8 bit codes of the good old days.
Unicode uses three sets of eight bits for each character, and UTF-8 uses 8 bits for the characters which were originally defined in ASCII, but it adds 8 or 16 bits to allow characters from some other languages. This ability to use the shortest representation available for a character saves a lot of space when compared to Unicode. That’s important on the Internet.
If you will scroll back and look at the first example of the Export GEDCOM File screen, you will see that the Version: is set to 5.5, and it is grayed out. No other value can be selected. I went back to the top drop down window, and I selected Other. That’s how I discovered that Version: can contain either 4.0 or 5.5. I also discovered that Char Set: can contain four values: ANSI, ANSEL, UTF-8 and Unicode. By selecting different destination software in the upper window, I discovered that different software allowed for different combinations of allowed values in the other two windows, and sometimes those values were pre-selected for that software. The following chart shows what I found.
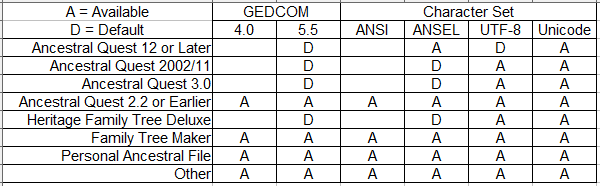
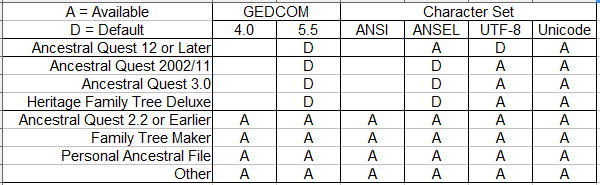
When GEDCOM 5.5 was the default, the Version: window was grayed out. Sometimes there were three allowed character sets, and sometimes four. I rearranged the chart and grouped the software into three groups.
I considered the importance of keeping the GEDCOM file small, and the flexibility of using the more extensive options available in GEDCOM 5.5, and I made the following decision.
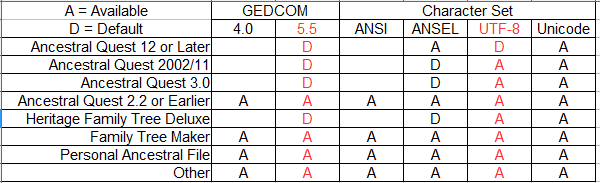
I will always use GEDCOM 5.5 and the UTF-8 character set. With that decision made, I proceeded to the center section of the Export GEDCOM File screen, Include. These check boxes are, for the most part, self explanatory. The exception is the Encode Scrapbook Items check box. As far as I know, Ancestral Quest is the only genealogy software product which will encode images, and include them in your GEDCOM file. Let me make one thing clear. This will make your GEDCOM file MUCH larger. Don’t plan on encoding large numbers of images and sending the GEDCOM file as an attachment to your email.
The last section of the Export GEDCOM File screen is Selected Individuals. This is where you decide whether to send All of your file,or a Partial file. The All radio button is the default. If this is what you want to send, click the Export button.
If you click the Partial button, the Select… button goes active. If you have previously selected a group of individuals with the Select Set of Individuals screen Ancestral Quest will tell yo how many people are selected, and you could choose to export that group. If you did not want to export that group, or if no group is selected, you would click the Select button.

Since my Combined Count is greater than 0, I will use the active Clear button to set that count to 0. I can now use this screen to select the group I want in my GEDCOM. The selection process will be covered in another article. I click the Export… button.

This opens the Export GEDCOM File As screen. If you have set File and Folder preferences, and established a folder for all your GEDCOM files, then what you see should be something like this. If you have not done this, you will need to search for a location for your GEDCOM file. When you have the destination selected, click the Export button.
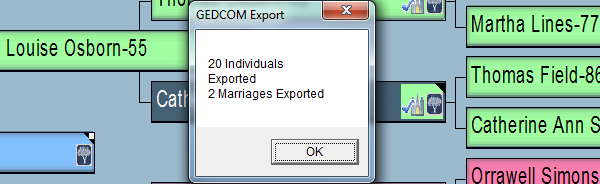
Ancestral Quest tells you how many Individuals and Marriages were exported.
That completes the Export phase of GEDCOM.
Suggestions/Questions about AQ Will Do or Subjects discussed here? Leave a Comment.
- Posted in: GEDCOM ♦ Genealogy ♦ How to...
- Tagged: Ancestral Quest, Export, GEDCOM, Genealogy, Genealogy Software, Incline Software


